UDM Pro commands

List of commands to troubleshoot UDM Pro;

The best command for packet related issues is tcpdump

tcpdump <interface> -w <filename.pcap>

Most of the commands are just Linux commands. However some are unique to the UDM/UDM-P.

Cisco/EdgeOS/VyOs Command/Best descriptionUDM/UDM-P SSH Command
show versioninfo
show system hardware and installed softwareubnt-device-info summary
show cpu tempetureubnt-systool cputemp
show fan speedubnt-fan-speed
show uptimeuptime
show ip routenetstat -rt -n
show tech-support (dump a file for tech support)ubnt-make-support-file <file.tar.gz>
show ppp summerypppstats
show current userwhoami
show logcat /var/log/messages
show interface summaryifstat
show interfacesifconfig
show other Ubiquiti devices on local LAN segment (ubnt-discovery)ubnt-tools ubnt-discover
show config (wireless)cat /mnt/data/udapi-config/unifi
show DHCP leases (to NSname)cat /mnt/data/udapi-config/dnsmasq.lease
packet capturetcpdump
shutdownpoweroff
reloadreboot
show ipsec saipsec statusall
factory resetfactory-reset.sh
show system burnt in MAC addressubnt-tools hwaddr
Unifi Server commands (logs files)
show unifi server logscat /mnt/data/unifi-os/unifi/logs/server.log
show unifi server setttingscat /mnt/data/unifi-os/unifi-core/config/settings.yaml
show unifi server http logscat /mnt/data/unifi-os/unifi-core/logs/http.log
show unifi server http logs (errors)cat /mnt/data/unifi-os/unifi-core/logs/errors.log
show unifi server discovery logcat /mnt/data/unifi-os/unifi-core/logs/discovery.log
show unifi system logscat /mnt/data/unifi-os/unifi-core/logs/system.log

Tested with 1.8.3-5

To restart UDM Pro to release memory pressure without restarting, SSH and enter this;

unifi-os restart

To update udm pro software;

Start unifi shell = “unifi-os shell” and then apt update && upgrade

Resource

Click this link to see the reference.

Cloud key upgrade

Upgrading cloud key sucks but works. After upgrade log in to unifi ui. You would see blue lights back on. Disable system-d. Check if dnsmasq is working, if not try to install resloveconf package.

Enable systemd using these commands;

sudo systemctl enable systemd-resolved
sudo systemctl start systemd-resolved
sudo systemctl status systemd-resolved

Login to your cloud key and make sure its working (blue lights :))

DNS resolution will not work. The problem is pihole unbound resolution. Add these lines to /etc/resolveconf.conf

nameserver 8.8.8.8
nameserver 8.8.4.4

check the status of dnsmasq;

#disable systemd-resolved first
sudo systemctl stop systemd-resolved
sudo systemctl disable systemd-resolved
sudo systemctl status dnsmasq

If dnsmasq is running, proceed. don’t restart. reinstall pihole and restore from backup. Follow these after pihole installation (couldn’t find an easier solution);

#Reconfigure lighttpd port (for example 8080)
nano /etc/lighttpd/lighttpd.conf
#Restart lighttpd
/etc/init.d/lighttpd restart
#Change the pi-hole random password to your liking
pihole -a -p

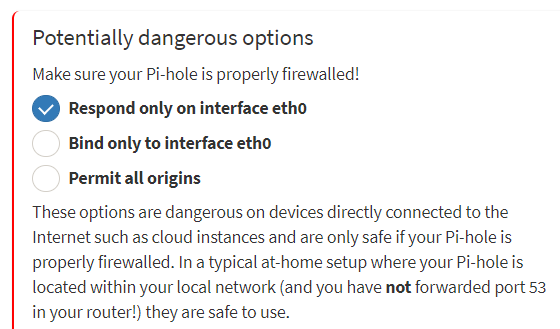
Pi-hole has dnsmasq embedded in pihole-FTL, and a separate dnsmasq on the host is not required and causes problems as you have discovered.

sudo netstat -nltup | grep 'Proto\|:53 \|:5053 \|:5353 \|:5335 \|:8953 \|:67 \|:80 \|:471'

sudo service dnsmasq stop

sudo systemctl disable dnsmasq

sudo apt-get remove dnsmasq-base

sudo service pihole-FTL start

Pihole somehow keep existing configuration. Navigate to the URL and it should be up and running.

To re-purpose cloud key, follow this link.

Resources

https://stackoverflow.com/questions/24967855/curl-6-could-not-resolve-host-google-com-name-or-service-not-known

DNS – NSLOOKUP what is the meaning of the non-authoritative answer?

Non-authoritative answer simply means the answer is not fetched from the authoritative DNS server for the queried domain name.

First you have to understand how DNS system works. DNS system can be divided into three tiers. They are:

  • root DNS servers
  • top-level domain DNS servers
  • authoritative DNS servers

There’s another class of DNS Server usually called local DNS server whose IP address is specified on your operating system.

When your browser connects to a website say example.com, the browser first queries your local DNS server to get the IP address of example.com.

  • If the local DNS server doesn’t have the A record of example.com, it will query one of the root DNS servers.
  • The root DNS server will say: I don’t have the A record but I know the top-level domain DNS server which is responsible for .com domains.
  • Then your local DNS server query the top-level domain DNS server which is responsible for .com domains. The TLD DNS server will respond: I don’t know either but I know which DNS server is authoritative for example.com.
  • So your local DNS server queries the authoritative DNS server. Because the actual DNS record is stored on that authoritative DNS server, so it will give your local DNS server an answer.

Then this query result is cached on your local DNS server but it can be outdated. When the TTL time has expired, your local DNS server will update the query result from the authoritative DNS server. Whenever you query a DNS record on your local DNS server, it returns a non-authoritative (unofficial) answer. If you want an authoritative answer, you must explicitly specify the authoritative DNS server when you use nslookup or other utilities. I think a local DNS server should be called caching DNS server.

When someone registers a domain name, he/she can specify which DNS server is the authoritative DNS server. This information is called an NS record. The NS record will tell a top-level domain DNS server which nameserver holds the domain’s A record, MX record, etc.

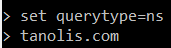
run nslookup and enter this;

The authoritative name servers for this domain are in red block.

Resource

https://serverfault.com/questions/413124/dns-nslookup-what-is-the-meaning-of-the-non-authoritative-answer

Re-purpose Cloud Key Gen2 Plus for Pi-Hole

I have upgraded cloud key with UDMPro. UDMPro don’t have a DNS. I plan to use Cloud Key as DNS and wanted to install PI-HOLE on it.

Followed these steps.

a) Factory Restore Cloud Key Power off the system.

b) Press and hold the reset button and then power on the Cloud Key by connecting it to the power source.
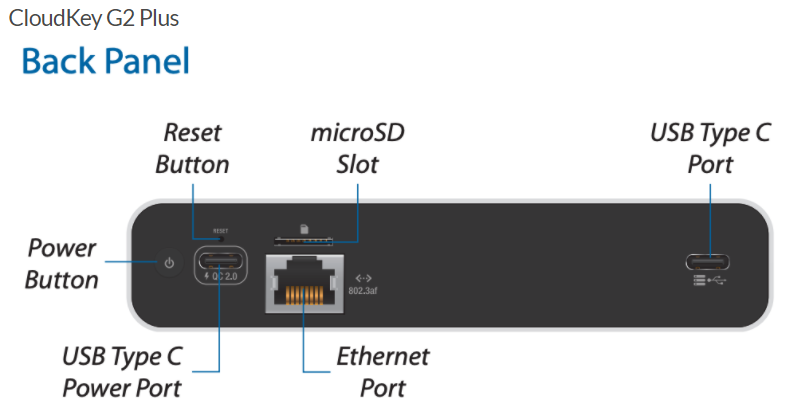
CloudKey G2 Plus
  • Keep the reset button pressed for about 10 seconds, or until you see the recovery LED pattern in a loop (blue – off – white). The LCD screen on the front panel will also read “RECOVERY MODE.”
  • Once the LED is flashing in the recovery mode pattern, open your browser and type the IP address for the Cloud Key, visible on the device’s screen. The IP address comes from your DHCP server, if you can’t access DHCP, the fallback IP will work: 192.168.1.30. However, keep in mind that if your Cloud Key does have a IP address assigned by the DHCP server, the fallback IP will not work.
  • You should be taken to the Recovery Mode screen. From here you can reset, reboot, power off and most importantly you can upload an updated firmware bin file.

Click ton Reset to Factory Defaults and then Reboot. It would take 2-3 minutes to come back with a steady white light. You would see information on the LCD that its ready to be configured.

You can see the latest firmware by clicking here.

2) Open your browser and type the IP address for the Cloud Key, Disable update/diagnostic in wizard

Let it set up. After update, I can see UniFi OS Version2.3.10 on Cloud Key.

Uninstall All applications, Settings -> Update. There are three dots on the right of application icon, click and uninstall.

Enable SSHS by going into Settings -> Advanced and SSH.

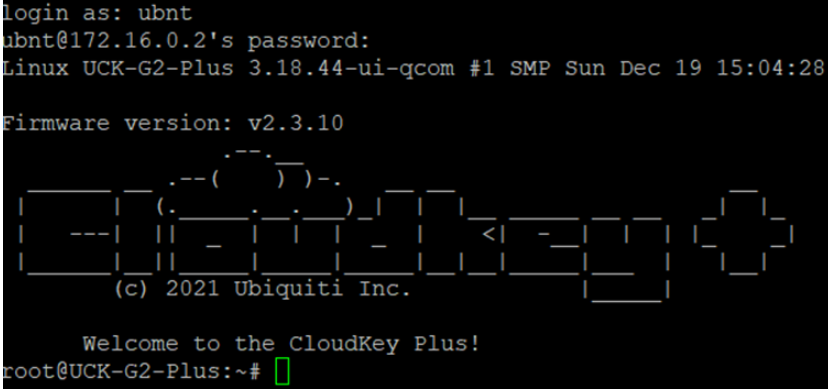
Open Putty and SSH into Cloud key;

User = ubnt

Password = your password

We are in console. If for some strange reasons, Web URL doesn’t work but SSH works, then cloud key can be reset to factory defaults by running this command;

/sbin/ubnt-systool reset2defaults

It’s time to re-purpose cloud key. I have found this sequence on unifi forum. Follow step by step;

#go superuser

sudo –i

#Let’s install nano to make conf edit easier

apt-get install nano

#Install dnsmasq

apt-get update

apt-get install dnsmasq

#(Answer Y to replace the files as keeping the existing will point to 01-pihole.conf which does not work until pi-hole is installed)

# Ubiquiti switched the resolver to systemd-resolved which reserves the port 53

# dnsmasq install will fail to start dnsmasq so lets resolve that

sudo systemctl stop systemd-resolved

sudo systemctl disable systemd-resolved

sudo systemctl start dnsmasq

#Install pi-hole

cd /tmp

wget -O basic-install.sh https://install.pi-hole.net

#Install optional dependencies

#apt-get install man

#Install required dependencies

apt-get install whiptail

apt-get install dhcpcd5

apt-get install git

apt-get install dnsutils

apt-get install lsof

apt-get install unzip

apt-get install idn2

#downgrade libsqlite3 to support sqlite3

apt-get install libsqlite3-0=3.16.2-5+deb9u1

apt-get install sqlite3

apt-get install resolvconf

apt-get install lighttpd

apt-get install php-common

apt-get install php-cgi

apt-get install php-sqlite3

sudo apt-get update

sudo apt-get upgrade

sudo apt-get full-upgrade

sudo apt-get –purge autoremove

# Install PI-HOLE now

bash basic-install.sh

if above command fail, run this;

curl -sSL https://install.pi-hole.net | bash

if above command to install PI-Hole fails on OS check, run this;

curl -sSL https://install.pi-hole.net | PIHOLE_SKIP_OS_CHECK=true sudo -E bash

#Reconfigure lighttpd port (for example 8080)

nano /etc/lighttpd/lighttpd.conf

#Restart lighttpd

/etc/init.d/lighttpd restart

#Change the pi-hole random password to your liking

pihole -a -p

Navigate to the URL and it should be up and running.

If the pi-hole is not exposed to internet and properly firewalled, you can choose one of these options;

This will help you to see all of your clients (wired/wireless). Also you wouldn’t see “DNS request timed out” when do a nslookup, for example

nslookup google.com

If you want to see LED scrolling on Cloud Key, install one of Unifi App for example Protect or Doorbell. I have no issues with Pi-Hole with the App.

Make these configuration changes after PI-Hole installations;

nano /etc/pihole/pihole-FTL.conf

PRIVACYLEVEL=0 
IGNORE_LOCALHOST=yes
MAXLOGAGE=24.0 
MAXDBDAYS=180

Restart pihole-FTL to make the changes effective

sudo service pihole-FTL restart

To uninstall Pi-Hole, run this command;

sudo pihole uninstall

After uninstalling, run these commands;

sudo systemctl enable systemd-resolved

sudo systemctl start systemd-resolved

Some frequent Pi-hole/Linux commands are;

# Pi-Hole related
# Command to see if the database exists:
stat /etc/pihole/pihole-FTL.db

#If it does, then run these commands:
sudo service pihole-FTL stop
sudo rm /etc/pihole/pihole-FTL.db
sudo service pihole-FTL start

# Pi-Hole stores its 24 hour log here:
/var/log/pihole.log

# debian related
dpkg --list
systemctl status lighttpd
systemctl start lighttpd
systemctl stop lighttpd
systemctl restart lighttpd
# List of ports that are in use
sudo lsof -l -P -n | grep LISTEN

Your Pi-Hole is up and running. It’s time to decide if you want Pi-hole as All-Around DNS Solution? If yes, then follow these instructions on Pi-Hole web site or this site.

You want to change database location, follow this link.

If Cloud key updated and Pi-hole does not work, follow this link.

Resources

Reset Cloud key via SSH

https://help.ui.com/hc/en-us/articles/220334168-UniFi-Cloud-Key-Emergency-Recovery-UI

https://community.ui.com/questions/CK2-Firmware-0-9-4-Pi-Hole-install/ad79a1f0-fedf-4853-9435-a92d845e4025

Turn Unifi Cloud Key into a headless linux server

DNSMASQ Failed to create socket

Scan docker containers for log4j/Log4Shell exploit

If you are running docker container on Unraid, follow these steps to scan containers; Open up a terminal window in unraid and copy/paste the following

curl -sSfL https://raw.githubusercontent.com/anchore/grype/main/install.sh | sh -s -- -b /usr/local/bin

This will install the grype package. “temporarily, if you reboot you will have to re-install the package again.”

Then use this command in the terminal window to list your docker containers

docker image ls -a

Once you have the name for your docker image, you can run the grype tool in the terminal window.

$grype "docker-image-name":"tag"

for examplel

grype linuxserver/sonarr:develop

The tool will then scan the image for all vulnerabilities and will print them all out on the screen as a list. Look for log4j.

Pulled from housewrecker/gaps..

log4j-api 2.14.1 2.15.0 GHSA-jfh8-c2jp-5v3q Critical

pulled from jbartlett777/diskspeed..

log4j 1.2.16 GHSA-2qrg-x229-3v8q Critical

log4j 1.2.16 CVE-2019-17571 Critical

log4j 1.2.16 CVE-2020-9488 Low

log4j 1.2.17 GHSA-2qrg-x229-3v8q Critical

log4j 1.2.17 CVE-2019-17571 Critical

log4j 1.2.17 CVE-2020-9488 Low

One last thing, you can install this tool on a different device but you’ll probably have to;

chown "user" /usr/local/bin/

“temporarily” on the terminal of your different device to make it work. The tool just pulls the current docker image from dockerhub so it doesn’t need to be ran on the same machine if you don’t want to.

Resources