SQL Server Change Data Capture

Change data capture (CDC) records insert, update, and delete activity that applies to a SQL Server table. This makes the details of the changes available in an easily consumed relational format.

To enable CDC, run this;

-- COMMAND TO ENABLE CDC on the Database
EXEC sys.sp_cdc_enable_db
GO

Look under Database Name -> Tables -> System Tables

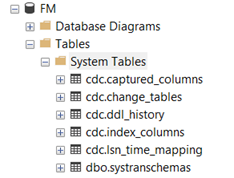
When a database is enabled for change data capture, the cdc schema, cdc user, metadata tables, and other system objects are created for the database. The cdc schema contains the change data capture metadata tables and, after source tables are enabled for change data capture, the individual change tables serve as a repository for change data. The cdc schema also contains associated system functions used to query for change data.

-- COMMAND TO DISABLE CDC on the Database
EXEC sys.sp_cdc_disable_db
GO

This will remove all CDC related objects.

How do I use it?

Our business requirements is to handle data changes in underlying relational database. My team members are mostly web developers and for them it’s no brainer. They can handle changes in code and write those changes to the tables. Yes, it’s doable but this will increase solution complexity and cost of the project. Budget is another limitation.

Microsoft SQL server offers CDC feature. Why not to leverage this feature and customize it to handle our situation.

Here is a prototype for implementing this feature. I am assuming that a database already exists with “FM” schema, all tables has primary key and SQL Server Agent is running.

Follow these steps;

We need to enable CDC on all tables. Run this script to enable CDC;

USE FM
go
if exists(select 1 from sys.databases where name ='FM' and is_cdc_enabled =1)
EXEC sys.sp_cdc_disable_db

go
-- COMMAND TO ENABLE CDC on the Database
EXEC sys.sp_cdc_enable_db
GO

DECLARE @source_schema sysname, @source_name sysname

DECLARE #finstance CURSOR LOCAL fast_forward
FOR
	select table_name,TABLE_SCHEMA from information_schema.tables 
	where table_name in(
				select distinct table_name from INFORMATION_SCHEMA.KEY_COLUMN_USAGE where constraint_name like 'PK%')
				and table_schema ='FM'  and TABLE_NAME not in ('sysdiagrams')

OPEN #finstance
FETCH #finstance INTO @source_name,@source_schema
	
WHILE (@@fetch_status <> -1)
BEGIN
    print 'Schema is ' + @source_schema + ' , ' +  'Table Name is ' +@source_name 

	EXEC [sys].[sp_cdc_enable_table]
		@source_schema
		,@source_name
		,@role_name = NULL
		,@supports_net_changes = 1
			
	FETCH #finstance INTO @source_name,@source_schema
END
	
CLOSE #finstance
DEALLOCATE #finstance
GO

To test, Make sure Project Table is empty. Let’s test CDC;

SELECT * FROM [FM].[Project]
SELECT * FROM [cdc].[FM_Project_CT]

Add some records in Project Table;

INSERT [FM].[Project]
(ProjectTitle, ProjectStartDate, ProjectDescription)
VALUES
('kalpesh title', '6/1/2021', 'kalpesh big test')

Here is the result;

Make changes to the table;

UPDATE [FM].[Project]
SET 
	ProjectTitle = N'some other title',
	ProjectDescription = N'someones novel...'
WHERE ID = N'E90F6FD5-CCCA-EB11-ACB9-8CC84B4006DC'

Here is the result;

Great. I can see the feature works fine.

The developer can use following query to get complete picture;

SELECT 
	src.id, 
	Operation = CASE trgt.[__$operation]
		When 1 Then 'Delete'
		WHEN 2 Then 'Insert'
		WHEN 3 Then 'Update row before the change'
		WHEN 4 Then 'Update row after the change'
		ELSE 'Unknown'
	END,
	src.projectTitle sTitle, src.projectdescription sProjectDescription,
	trgt.projectTitle tTitle, trgt.projectdescription tProjectDescription
FROM [FM].[Project] src
JOIN [cdc].[FM_Project_CT] trgt on src.id = trgt.id

Here are the results;

A little bit explanation about tracking table;

When the feature is enabled on a table, the change table named cdc.<captured_instance>_CT is automatically created in the tracked database. The table contains a row for each insert and delete on the source table, and two rows for each update. The first one is identical to the row before the update, and the second one to the row after the update. To query the table, use the cdc.fn_cdc_get_all_changes and cdc.fn_cdc_get_net_changes functions

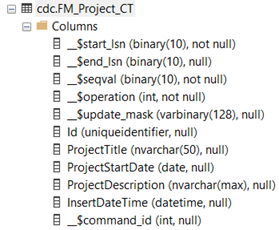
The first five columns contain the metadata necessary for the feature, the rest are the exact replica of the source table
__$start_lsn – the Log Sequence Number of the commited transaction. Every change committed in the same transaction has its own row in the change table, but the same __$start_lsn
__$end_lsn – the column is always NULL in SQL Server 2012, future compatibility is not guarantee
__$seqval – the sequence value used to order the row changes within a transaction
__$operation – indicates the change type made on the row

  1. Delete
  2. Insert
  3. Updated row before the change
  4. Updated row after the change

__$update_mask – similar to the update mask available in Change Tracking, a bit mask used to identify the ordinals of the modified columns

How do I customize this feature to work as per my requirements?

DDL changes (New tables, column changes) affect this process. Disabling CDC will remove all cdc generated tables and data. Enable CDC will recreate all cdc tables. I can not risk loosing data!

One method to solve is to create another database, say FMAudit. Copy all cdc generated tables to that database (use Generate schema feature of SQL Server). Create a schedule process (use SSIS or windows service) that will copy and truncate data from source database. Use SQL Agent and Keep process schedule time to 10 seconds.

Stay tuned for my next article about this method.

Resource

https://docs.microsoft.com/en-us/sql/relational-databases/track-changes/about-change-data-capture-sql-server?view=sql-server-ver15

Unbind solution from TFS

My problem, I was opening a solution from the internet and the original author had forgotten to remove the TFS bindings, so every time I open the solution I’d get an annoying popup saying “binding…”.

To get rid of this, I deleted the .suo next to the .sln file, and then opened the .sln file in Notepad and deleted this entire section:

GlobalSection(TeamFoundationVersionControl) = preSolution
    SccNumberOfProjects = 2
    SccEnterpriseProvider = {xxxxx}
    SccTeamFoundationServer = http://some-other-guys-tfs-server/
    SccLocalPath0 = .
    SccProjectUniqueName1 = xxDemo\\xxDemo.csproj
    SccProjectName1 = xxDemo
    SccLocalPath1 = xxDemo
EndGlobalSection

Save the .sln in Notepad and then open in Visual Studio, problem solved.

Resources

https://stackoverflow.com/questions/358951/how-can-i-completely-remove-tfs-bindings

How to make a bootable USB?

A common use of a bootable USB flash drive is to use it to boot into Windows. Booting from removable media such as a USB drive allows you to perform diagnostics on a computer that is having trouble booting from the hard drive. You can also use the flash drive to install Windows, instead of using the Windows installation CD.

Windows vista and Windows 7 steps are applicable to Windows 10

This guide will outline making a bootable USB flash drive with Windows XP, Vista, or 7. Before we begin, it is important to note that the computer you want to use your bootable USB drive must be able to use a USB drive as a boot device. Most computers built since Windows Vista was released are capable of booting to a USB device. Prior to the Windows Vista time frame, it’s hit or miss with motherboards.

To determine if a computer is capable of booting to a USB device, access the computer’s BIOS and check the bootable device list. If a USB device is listed, set the USB drive to be the first boot device. If you do not see a USB device in the list of bootable devices, your BIOS is not capable of booting to a USB device.

Note: You may need to have your USB flash drive plugged in when you access the BIOS).

Windows Vista and Windows 7 users
Windows XP users

Windows Vista and Windows 7 users

To make a bootable USB drive for Windows Vista or Windows 7, you need to have Windows Vista or 7 installed on your computer. It is recommended that you have a flash drive of at least 4 GB in size, to store all the necessary files.

Tip: Before you start, plug in the USB drive and backup any files you have stored on the USB drive. The drive will be formatted during this process and all files on it will be deleted.

Note: You need to have a Windows Vista or Windows 7 DVD for these instructions to be successful.

1. Open an elevated Windows command line window by clicking Start, typing in cmd in the search text field, then pressing CTRL + Shift + Enter on your keyboard (at the same time). You can also access this by navigating to Start, All Programs, Accessories, right-click with your mouse on the Command Prompt menu item and select Run as Administrator.

2. At the command prompt, type cd c:\windows\system32 to change the directory to the Windows system32 directory. Ensure your USB drive is plugged in, type DISKPART, then press Enter. Type LIST DISK and press Enter.

3. You will see a listing of the disk drives connected to your computer. Find the disk number of your USB drive and type SELECT DISK [USB disk #], where “[USB disk #]” is the disk # for your USB drive. It should now state that your USB drive is the selected disk. If you’re not sure what disk is the USB disk, eject the USB drive, perform step number 2 again, connect the USB drive again, and compare the results. Usually the USB drive will be the last drive.

4. Type in the following commands, one by one, pressing Enter after each command.

CLEAN

CREATE PARTITION PRIMARY

SELECT PARTITION 1

ACTIVE

FORMAT FS=NTFS
(may take a couple minutes, depending on the USB drive size)

ASSIGN

EXIT

Keep the command prompt window open, but you can minimize it for a little bit.

5. You will now need your Windows Vista or 7 Installation DVD. Put the DVD in your computer’s DVD drive. Open up My Computer and note which drive letter is assigned to your DVD Drive and your USB flash drive.

6. Go back to the command prompt window and type in D: CD BOOT (substitute your DVD drive letter for “D:”, if necessary) and press Enter. Type CD BOOT again and press Enter. Lastly, type BOOTSECT.EXE /NT60 H: (substitute your USB flash drive letter for “H:”, if necessary) and press Enter.

7. The last step is to copy the entire contents of the Windows DVD to your USB flash drive. To do this, in the My Computer window (opened in step 5 above), right-click on the DVD drive and select Open to view the contents of the DVD. Copy all the files and folders on the DVD to the USB flash drive.

Your USB flash drive is now set up to be a bootable USB drive for Windows Vista or 7.

Windows XP users

To make the bootable USB drive for Windows XP, it is recommended that you have a flash drive of at least 4 GB in size, to store all the necessary files. You also need to download Windows Server 2003 SP1 and a program called PE Builder (also known as Bart PE).

Tip: Before you start, plug in the USB drive and backup any files you have stored on the USB drive. The drive will be formatted during this process and all files on it will be deleted.

Note: You need to have a Windows XP Professional CD for these instructions to be successful. Windows XP Home Edition does not work.

1. Install PE Builder on your computer. For the sake of ease, install the program to a C:\PEBuilder folder. After you’ve installed PE Builder, create a folder titled SRSP1 in the PEBuilder folder.

2. Now you need to extract two files from Windows Server 2003 SP1. The file name is quite long, so it is recommended that you rename the file to something shorter, like WS-SP1.exe. Open a command prompt (Start > Run, type cmd and press Enter) and use the cd command to change to the folder where you downloaded the Windows Server 2003 SP1 file to (i.e. cd c:\downloads to change to the c:\downloads folder). Then, type WS-SP1.exe -x to extract the files. A window should open asking where to extract the files. You can enter the same folder where the file was downloaded.

3. A new folder titled i386 will be created by the extraction process. Type cd i386 to change to that folder. You now need to copy the setupldr.bin file to the SRSP1 folder you created in the PE Builder folder. Type copy setupldr.bin c:\PEBuilder\SRSP1 to copy the file.

4. You also need to expand the ramdisk.sys file to the SRSP1 folder.
Type expand -r ramdisk.sy_ c:\PEBuilder\SRSP1

5. Open My Computer and navigate to the c:\PEBuilder\SRSP1 folder and verify the two files are there.

6. Next, you need to create a compressed version of Windows XP using PE Builder. Make sure the Windows XP Professional CD is in your computer’s CD drive, then launch the PE Builder program. In the Source field, type in the drive letter assigned to your CD Drive (you can check in My Computer if you are not sure) (e.g. “d:“). In the Output field, type BartPE. Make sure the None option is selected in the Media output section. Then click the Build button.

A progress report shows the progress of the bootable image build. When the build process is complete, click the Close button.

7. Now, you can create the bootable USB flash drive. Open a command prompt again and type cd c:\PEBuilder to change to the PEBuilder folder. Make sure your USB drive is plugged in to your computer and type pe2usb -f e: (change “e:” to the drive letter assigned to your USB flash drive, if necessary) to create the bootable drive. When prompted to begin the process, type YES. When the process is complete, press any key to exit the program.

Your USB flash drive is now set up to be a bootable USB drive for Windows XP using the Bart PE interface.

Resources

https://www.computerhope.com/jargon/m/mycomput.htm

Azure DevOps free tier max out, buying license for additional user

Azure Free tier is limited to 5 users. If you have connected Azure DevOps to Microsoft Azure then buying is really simple. To buy additional license, follow this;

Click on Organization Settings -> Billing

You would see your Azure subscription ID in Billing page;

As of this writing additional user will cost your $6/month.

How can I stop paying for users who aren’t actively using Azure DevOps?

If you have inactive users, stop paying for them by removing them or assigning them a free Stakeholder access level. Sort by Last Access to find users who haven’t accessed the organization recently. Find out how recently they got added by exporting the list of users and checking the Date Created column.

Last access

How do I see only my Azure DevOps charges?

Follow these steps to see only your charges for Azure DevOps.

  1. In the Azure portal, select Subscriptions > Cost analysis.
  2. Filter on Service name = Azure DevOps.Filter by service name

How much am I currently spending on Azure DevOps?

Azure DevOps charges daily, so the best way to see what you’re currently paying for Azure DevOps is to view by daily costs.

  1. In the Azure portal, select Subscriptions > Cost analysis.
  2. View by Daily costs.View by Daily costs

Resources

https://azure.microsoft.com/en-us/pricing/details/devops/azure-devops-services/

https://docs.microsoft.com/en-us/azure/devops/organizations/billing/billing-faq?view=azure-devops#multi-org-billing