Start Debugging (pressing F5) is the normal way of launching your application in visual studio. Debugger would be attached automatically and you can expect to see debugging messages and breakpoints in your application.
A popular misconception is that Debugger doesn’t come into play for Release build. This isn’t true. Set a breakpoint in a Release build and then press F5 to see if it stops there. Some debugging messages are not happening in Release build for example message from System.Diagnostics.Debug class.
Start without Debugging
This will start the application (pressing CTRL + F5) without the debugger attached. That’s it. If we need to attached the debugger to this process afterwards, we can select Debug->Attach to Process option.
SQL Server 2012 has two new analytical functions, LEAD() AND LAG(). These functions return data from Next row (LEAD) and Previous row (LAG) of the same dataset without using self-join.
Let’s go with an example;
This is my initial dataset;
Here is the query to create this dataset;
IF OBJECT_ID('tempdb..#SampleDataSet') is not null drop table #SampleDataSet

SELECT *
INTO #SampleDataSet
FROM
(
	SELECT 1 LineId, '2017-04-01' StockId, 'Toyota' AS Make, 'Brown' AS Color, 'Sale' AS ActionType, '2017-4-15' ActionDate UNION
	SELECT 2 LineId, '2017-04-01' StockId, 'Toyota' AS Make, 'Brown' AS Color, 'Quote' AS ActionType, '2017-4-10' ActionDate UNION
	SELECT 3 LineId, '2017-05-01' StockId,'Toyota' AS Make, 'Red' AS Color, 'Sale' AS ActionType, '2017-5-15' ActionDate UNION
	SELECT 4 LineId, '2017-05-01' StockId, 'Toyota' AS Make, 'Red' AS Color, NULL AS ActionType, '2017-5-10' ActionDate UNION
	SELECT 5 LineId, '2017-06-01' StockId, 'Toyota' AS Make, 'Pink' AS Color, 'Sale' AS ActionType, '2017-6-15' ActionDate UNION
	SELECT 6 LineId, '2017-06-01' StockId, 'Toyota' AS Make, 'Pink' AS Color, 'Quote' AS ActionType, '2017-6-10' ActionDate UNION
	SELECT 7 LineId, '2017-07-01' StockId, 'Toyota' AS Make, 'Green' AS Color, 'Sale' AS ActionType, '2017-7-15' ActionDate UNION
	SELECT 8 LineId, '2017-07-01' StockId, 'Toyota' AS Make, 'Green' AS Color, 'Quote' AS ActionType, '2017-7-10' ActionDate UNION
	SELECT 9 LineId, '2017-08-01' StockId, 'Honda' AS Make, 'Silver' AS Color, 'Sale' AS ActionType, '2017-8-15' ActionDate UNION
	SELECT 10 LineId, '2017-08-01' StockId, 'Honda' AS Make, 'Silver' AS Color, 'Quote' AS ActionType, '2017-8-10' ActionDate UNION
	SELECT 11 LineId, '2017-09-01' StockId, 'Honda' AS Make, 'Brown' AS Color, 'Sale' AS ActionType, '2017-9-15' ActionDate UNION
	SELECT 12 LineId, '2017-09-01' StockId, 'Honda' AS Make, 'Brown' AS Color, NULL AS ActionType, '2017-9-10' ActionDate UNION
	SELECT 13 LineId, '2017-10-01' StockId, 'Honda' AS Make, 'Red' AS Color, 'Sale' AS ActionType, '2017-10-15' ActionDate UNION
	SELECT 14 LineId, '2017-10-01' StockId, 'Honda' AS Make, 'Red' AS Color, 'Quote' AS ActionType, '2017-10-10' ActionDate
) src
WHERE 1=1

/*
	This is my initial dataset
*/

SELECT * FROM #SampleDataSet src
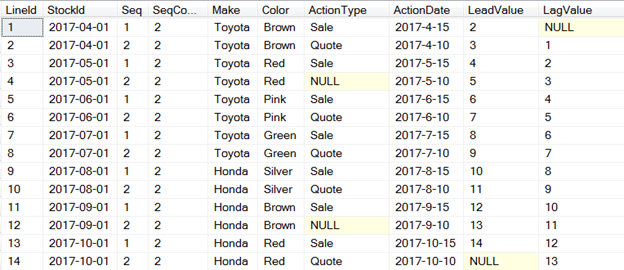
I am adding SeqCount and Seq column to identify each group of car (make and color) and each action in the group. LAG and Lead values of LineId column are used to demonstrate function output.
SELECT
	src.LineId, src.StockId,
	ROW_NUMBER() OVER (PARTITION BY StockId ORDER BY ActionDate DESC) Seq,
	COUNT(*) OVER (PARTITION BY StockId) SeqCount,
	src.Make, src.Color, src.ActionType, src.ActionDate,
	LEAD(src.LineId) OVER (ORDER BY src.LineId) LeadValue,
	LAG(src.LineId) OVER (ORDER BY src.LineId) LagValue
FROM #SampleDataSet src
This is the output of above query;
You can see the application of LEAD() and LAG() function in last two columns on the right side of above dataset.
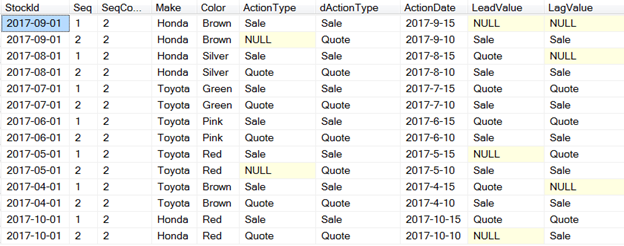
One of the possible application of this function. As a business rule every quote action must be preceded by sale action in a car dealer dataset. If quote action is null in a group, fix it.
SELECT
	src.StockId, src.Seq, src.SeqCount, src.Make, src.Color, src.ActionType,
	CASE WHEN src.LeadValue = 'Sale' AND src.ActionType IS NULL THEN 'Quote' ELSE src.ActionType END dActionType,
	src.ActionDate, src.LeadValue, src.LagValue
FROM
(
	--Dataset transformation
	SELECT
		src.StockId,
		ROW_NUMBER() OVER (PARTITION BY StockId ORDER BY ActionDate DESC) Seq,
		COUNT(*) OVER (PARTITION BY StockId) SeqCount,
		src.Make, src.Color, src.ActionType, src.ActionDate,
		LEAD(ActionType) OVER (ORDER BY ActionDate DESC) LeadValue,
		LAG(ActionType) OVER (ORDER BY ActionDate DESC) LagValue
	FROM #SampleDataSet src
) src
WHERE 1=1
Here is the output;
dActionType is a derived column that has all the correct sequence of actions with the help of Lead() and LAG() function.
This is tricky. Azure SAS SQL Database has master database only. If programmer is taking any advantage of MSDB databases or synonmous, it will not work there directly.
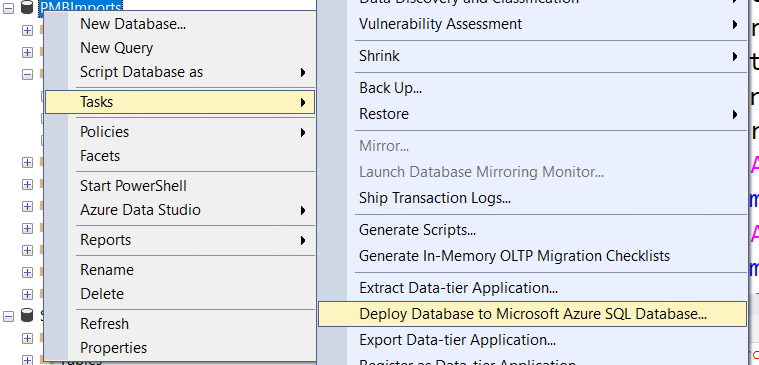
Use Deploy Database to Microsoft Azure SQL Database
The simple method to restore to Azure SQL Database is;
This will create a new database on Azure SQL Server. You can rename it to your actual database.
Migrate to Azure SQL by restoring from Database
This method requires Azure storage account.
Create a blob storage. Upload database backup. From SQL Management Studio, right-click to [YourLOCALDatabase] and open Tasks>Export Data-tier Application. You can export your database to Azure Blob Storage on this wizard. After backup, connect your Azure SQL Server from SQL Management Studio. Go to your [YourREMOTEDatabase], right-click Databases folder from treeview and go to Import Data-tier Application. Choose your backup file from Blob Storage and enjoy!
This will create a new database on Azure SQL Server. You can rename it to your actual database.
Use Azure Data Migration Assistant Tool
This is unlike other methods mentioned above. This is the most efficient tool for migration databases to Azure SQL. This gives you a chance to select individual objects (tables, stored procedures, views, functions etc). Here is the link;
The tool allows us to create azure backup on local/remote. We can restore those backups on local/remote machine. I have a schedule job on my local that run everyday 10:00AM to create full backup in Azure blob container “myContainer”.
This tool also allows you to backup on your local computer.
Other methods that can be used with Azure SQL Database;
Only data is imported, all other objects will be lost
Requires SQL Server Management Studio
Manual procedure
Use if you need to move data from Azure to a specific destination (e.g. your old SQL Server) or in a particular format (e.g. flat file) with SQL Server Management Studio tools
We can capture the screen and use a program, for example Greeshot, to open captured image.
Here are the tips to capture screen;
Print Screen
The easiest way to take a screenshot on Windows 10 is the Print Screen (PrtScn) key. To capture your entire screen, simply press PrtScn on the upper-right side of your keyboard.
The screenshot will be saved to your Clipboard.
Windows + Print Screen
To take a screenshot on Windows 10 and automatically save the file, press the Windows key + PrtScn.
Your screen will go dim and a screenshot of your entire screen will save to the Pictures > Screenshots folder.
Alt + Print Screen
To capture only the active window you’re working in and copy it to your Clipboard, press Alt + PrtScn
Snip & Sketch tool
To activate Snip & Sketch, use the keyboard shortcut Windows Key + Shift + S. Your screen will dim and a mini menu will appear at the top of your screen, giving you the option to take a rectangular, free-form, window, or full-screen capture.
Game Bar
The Game Bar is an overlay you can use within most Windows 10 apps and games to take screenshots and record video. To open the Game Bar, press Windows Key + G.
Power + Volume Up
To take a screenshot on Windows 10 with a Microsoft Surface device, press the Power Button + Volume Up Button. The screen will dim, and your screenshot will save to the Pictures > Screenshots folder.
Third-party screenshot apps for Windows
If you’re unsatisfied with any of the built-in Windows methods, there are third-party screenshot tools worth considering.;
GIFs, take full-page screenshots, and more. The downside? The premium version costs $50. There’s also a 30-day free trial, although any picture you capture during this trial will be watermarked.
Lightshot is a free screenshot tool designed for quick social sharing. When you download and install Lightshot on Windows 10, it replaces the Print Screen function and offers more editing capabilities.
Greenshot is another free tool that allows you to edit and customize screenshots, as well as the option to capture a complete scrolling web page.