Windows Snip & Sketch alternative

I like windows snip and sketch tool. The only draw back, you take a snapshot and if you want to draw rectangle around an area, it’s not possible in this tool. The snapshot has to be copied into MS Paint or Power Point to annotate. It’s kind a two step process.

The alternative is to use Greenshot which is a full featured snipping tool. Greenshot does come with an editor where you can easily add arrows, text, shapes, blur out/pixelate sensitive information.

Greenshot automatically copy the screenshot to the clipboard. At the time of installation it gets registered with windows and always available in the taskbar. If I need to edit a screenshot, I can right-click the greenshot icon and choose: Open Image from clipboard to access it in the editor. Once done, I then either save the image there or choose copy to clipboard, to send the edited version back to the clipboard, ready to be pasted somewhere else.
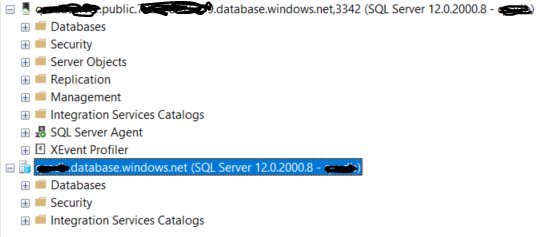
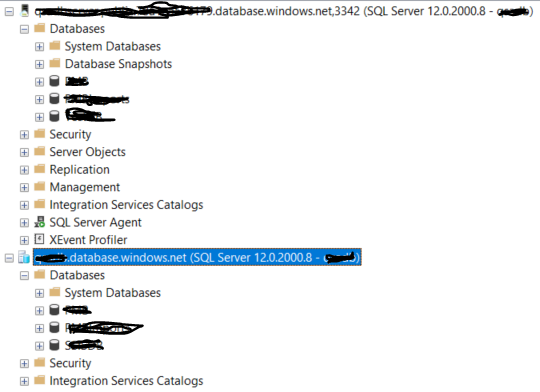
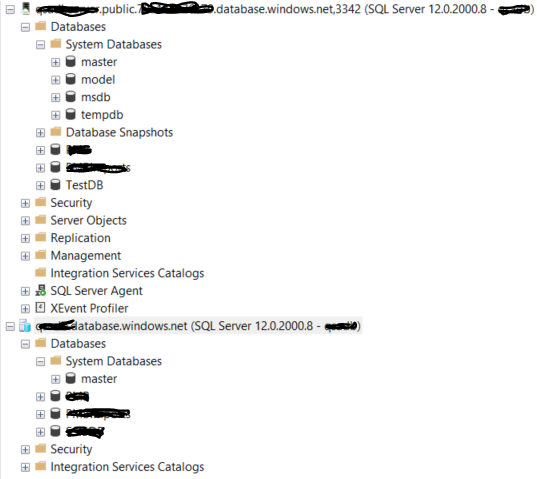
Here is an example;

Donate:

Single database and Managed Instance comparison

Just out of curiosity, here is top level comparison; first one is managed instance, second one is Single database;

Top level comparison;

Databases level comparison;

System level databases;

Single database has just master database;

master database object layout

System level security

Single database does not have these root level objects;

Server Objects, Replication, Management, SQL Server Agent, XEvent Profiler

Integration Services Catalogs doesn’t exists on both services. Azure Data Factory integration services need to be provisioned to create SSIS database under Integration Services Catalogs.

Reporting services does not exists here. Power BI integrated Reporting services needs to be provisioned.

ngTemplate, ng-Content, ngContainer, *ngTemplateOutlet

<ng-template>

It’s a template element that Angular uses with structural directives (*ngIf, *ngFor, [ngSwitch] and custom directives).

These template elements only work in the presence of structural directives. Angular wraps the host element (to which the directive is applied) inside <ng-template> and consumes the <ng-template> in the finished DOM by replacing it with diagnostic comments.

Resources

https://www.freecodecamp.org/news/everything-you-need-to-know-about-ng-template-ng-content-ng-container-and-ngtemplateoutlet-4b7b51223691/

Azure database connection string

If we want to connect to your local database server using windows security;

{
  "ConnectionStrings": {
    "MyDbConnection": "Server=(local);Database=MyDatabase;Trusted_Connection=True;MultipleActiveResultSets=true"
}

If we want to connect to your remote database server using windows security;

{
  "ConnectionStrings": {
    "MyDbConnection": "Server=1.1.1.1;Database=MyDatabase;Trusted_Connection=True;MultipleActiveResultSets=true"
}

If we want to connect to Azure SQL database server using SQL Server security;

{
  "ConnectionStrings": {
    "MyDbConnection": "Data Source=databaseserver.database.windows.net;Initial Catalog=MyDatabase;User ID=dbuser;Password=dbuserpassword;Connect Timeout=30;Encrypt=True;MultipleActiveResultSets=true;TrustServerCertificate=False;ApplicationIntent=ReadWrite;MultiSubnetFailover=False"
}

if we want to connect to Azure SQL database using Azure AD identity

Server=tcp:myserver.database.windows.net,1433;Authentication=Active Directory Integrated;Database=mydatabase;

If we want to connect to Azure SQL database using Azure AD identity username and password

Server=tcp:myserver.database.windows.net,1433;Authentication=Active Directory Password;Database=myDataBase;UID=myUser@myDomain;PWD=myPassword;

If we want communication to be always encrypted

Data Source=myServer;Initial Catalog=myDB;Integrated Security=true;Column Encryption Setting=enabled;

Branching flow using UI

Follow these steps;

Click on Manage Branches. Select main branch. Select Sync to sync your local branch.

Everything looks good. Move on with creating a new branch.

Click on Manage Branch and New Branch.

Your view would be changed to newly created branch.

Start work. Change something in about.cshtml page, Save and commit; If that’s all you need to work on then push your local branch to remote. Click on Home icon; Click Sync.

You can see there are no incoming changes on this branch. there are outgoing changes that you have made. There is a message that’s telling you that this branch does not exists on remote server.

Click Push. You will see this view;

Click on “Create a pull request”. Create/Approve and complete your pull request on Azure DevOps UI. Your branches view would be;

Your merge is completed. Do a sync here.

Switch to main branch. do a sync here. You will see this;

There are two commits went into main branch. first one is the pull request merge and second one is the change you made. Click on Sync. It will pull remote commits to your local.

Your main branch is up to date for your next branch work.