2022 might be the year of DevOps alternatives, including cloud providers, CI/CD tools and even containers. Speaking of containers, Podman looks like a promising alternative to Docker. Let’s see how they differ from each other.
Architecture
The Docker installation includes the Docker Daemon, the Docker API, and the Docker CLI. Docker Daemon is a process which creates and manages the Docker images, containers, networks and volumes. It becomes a single point of failure since this process owns all of the child processses (docker containers). If you decide to install the Docker Desktop version (Mac or Windows), you might also get an option to enable local Kubernetes cluster feature.
Basically, Docker uses a client-server model and operates as a all-in-one solution for container orchestration.
On the other side, Podman is a daemon-less tool for developing, managing and running OCI-compatible (Docker is OCI-compatible as well) containers. Podman directly interacts with image registries, containers and volume storages, whereas Docker do this through the Daemon, hence Podman doesn’t need a daemon (uses Systemd instead to support running containers in the background). The containers are run under the user starting the containers, which brings up to the second point, Security.
Security
By default Docker Daemon runs as a root user, which is so bad. It enables a privilege escalation. By any means, you could run Docker in a rootless mode and isolate containers with user namespaces, but it takes a while to configure it.
While Podman could be run as a root as well, running Podman as a nonprivileged user is a foundational feature, and it’s easier to setup.
Building images
Docker uses a native built-in command line tool to build images:
docker build .
Podman relies on third-party tools, for instance Buildah is the most popular choice.
Pricing
Although Docker CE is free and open source, recently Docker comes up with a Subscription-based pricing plan, which mostly impacts medium and large enterprises.
Podman is free and open source.
Container Orchestration
Docker comes with a Docker Swarm container orchestrator.
Podman doesn’t support Docker Swarm. Added support for docker-compose though.
Which one is the right one for you?! For beginners, Docker is a no-brainer, but once you start going down into the container rabbit hole, Podman would be the next wise choice.
This is not a good idea but sometime you need it for testing.
By default, the SSH server denies password-based login for root. In /etc/ssh/sshd_config, if the following line exists, possibly commented out (with a # in front):
PermitRootLogin without-password
Then change it to the following, uncommenting if needed (remove the # in front):
PermitRootLogin yes
And restart SSH:
sudo service ssh restart
Or, you can use SSH keys. If you don’t have one, create one using ssh-keygen (stick to the default for the key, and skip the password if you feel like it). Then do sudo -s (or whatever your preferred method of becoming root is), and add an SSH key to /root/.ssh/authorized_keys:
Edit /etc/apt/sources.list and paste following text.
deb http://deb.debian.org/debian/ stretch main contrib non-free
deb http://deb.debian.org/debian/ stretch-updates main contrib non-free
deb http://deb.debian.org/debian/ stretch-backports main
deb http://security.debian.org/ stretch/updates main contrib non-free
Remove all files from /etc/apt/sources.list.d
You might see this file after upgrade.
You will get the stretch based release candidate from ubiquiti.
Now were going to run through all the commands below. You will get some prompts about updating components, and restarting services, answer yes to these.
If you want to upgrade packages, go through these commands;
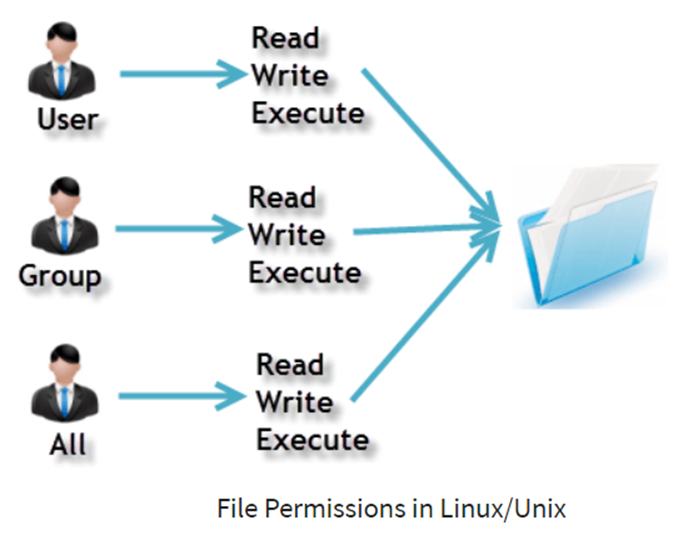
Linux is UNIX clone. For effective security, Linux divides authorization into 2 levels, Ownership and Permission.
Every file and directory is assigned 3 types of owner; User, Group and Other.
User is the owner of the file. By default, the person who creates a file becomes its owner. A logged-in user sometimes called an owner.
A user-group can contain multiple users. All users belonging to a group can have similar permissions. In this case the ownership belong to a group.
Other means setting permissions to the world. This person has neither create a file, nor belongs to a user group.
How Linux distinguish between these three users? This is where permissions comes in. Permission defines the user behavior.
Every file and directory has 3 permissions defined for 3 owners.
Read permission gives the authority to open and read a file. Read permission on directory gives the ability to lists its content.
Write permission gives the authority to modify the contents of a file. The write permission on a directory gives the authority to add, remove and rename files. Consider a scenario where you have to write permission on file but do not have write permission on the directory where the file is stored. You will be able to modify the file contents. But you will not be able to rename, move or remove the file from the directory.
Execute permission gives the authority to execute a program. In Windows, an executable program usually has an extension “.exe” and which you can easily run. In Unix/Linux, you cannot run a program unless the execute permission is set. If the execute permission is not set, you might still be able to see/modify the program code (provided read & write permissions are set), but not run it.
To summarize this, the Owner assigned permissions on every File and Directory.
Some Examples
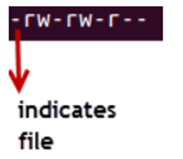
ls -l
The highlighted “-rw-rw-r–“ code is the one that tells us the permission given to owner, group or the world.
The first ‘–‘ tells us that we have selected a file.
If this were a directory, d would be shown here;
The characters are pretty easy to remember.
r = read permission w = write permission x = execute permission – = no permission
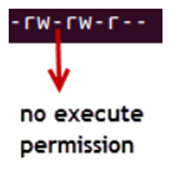
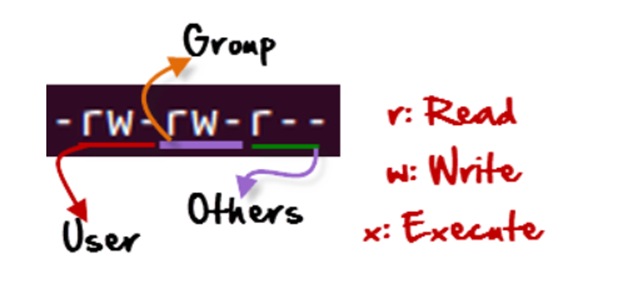
Let’s read and understand our sample file;
The first part of the code is ‘rw-‘. This is for the user. This tells us that the user can:
Read the file
Write or edit the file
He cannot execute the file since the execute bit is set to ‘-‘.
The second part is ‘rw-‘. This is for the user group for example ‘Home’. Group-members can:
Read the file
Write or edit the file
The third part is for the world which means any user. It says ‘r–‘. This means the user can only:
Read the file
Changing file/directory permission using ‘chmod’ command
To restrict user access (owner, group and the world) to files and folders we will use permissions (read, write, execute) using chmod (change mode) command.
chmod permissions filename
We can use Absolute (Numeric) mode or Symbolic mode to do this.
In Absolute mode, file permissions are not represented as characters but three-digit octal number. Here is a table that shows all possible permission types.
Number
Permission Type
Symbol
0
No Permission
—
1
Execute
–x
2
Write
-w-
3
Execute + Write
-wx
4
Read
r–
5
Read + Execute
r-x
6
Read +Write
rw-
7
Read + Write +Execute
rwx
Some Example
Checking current file permission;
chmod 764 and checking permission again;
chmod 764 MySmpleFile.txt
764 absolute code means;
Owner can read, write and execute (7). Usergroup can read and write (6). World can only read (4). This is shown as ‘-rwxrw-r–. In this mode we change permission for all 3 owners.
In Symbolic mode we change permissions of specific owner. It uses mathematical symbols.
Operator
Description
+
Adds permission to a file or directory
–
Removes the permission
=
Sets the permission and overrides earlier permissions set
The owners are represented as;
u
user/owner
g
group
o
other
a
all
Permission is set using characters like rwx. Here is an example;
Reset permission for this step;
chmod 664 MySmpleFile.txt
Current file permission
Setting permission to ‘other users’ AKA ‘world’ users
chmod o=rwx MySmpleFile.txt
Adding ‘Execute’ permission to usergroup.
chmod g+x MySmpleFile.txt
Removing ‘read’ permission for ‘user’
chmod u-r MySmpleFile.txt
For changing ownership and group of a file/directory, we use this command;
chown user filename
If we want to change the user and group for a file / directory, we use this command;
chown user:group filename
Here are examples;
Reset permission for this step;
chmod 664 MySmpleFile.txt
Check the current file ownership
Change file owner to pihole.
chown tanolis MySmpleFile.txt
Change file group to tanolis
In case, you don’t have the group, use this command to create one;
groupadd tanolis
change user and group back to root
In case we want to change group-owner only, we use this command;
chgrp group_name filename
‘chgrp’ stands for change roup.
Check current file group owner
Change the group owner to tanolis
Some key commands
The file /etc/group contains all the groups defined in the system
cat /etc/group
You can use the command “groups” to find all the groups user is member of.
You cannot have 2 groups owning the same file.
You do not have nested groups in Linux. One group cannot be sub-group of other
x- eXecuting a directory means Being allowed to “enter” a dir and gain possible access to sub-dirs.