I would like to loop through following collection of authors and for each author retrieve its first and last name and put them in a variable strFirst and strLast?
We’ll use XmlDocument class to parse this XML fragment;
using System;
using System.Xml;
public class XMLApp
{
    public void YourMethod(String strFirst, String strLast)
    {
        // Do something with strFirst and strLast.
        // ...
        Console.WriteLine("{0}, {1}", strLast, strFirst);
    }
    public void ProcessXML(String xmlText)
    {
        XmlDocument _doc = new XmlDocument();
        _doc.LoadXml(xmlText);
        // alternately, _doc.Load( _strFilename); to read from a file.
        XmlNodeList _fnames = _doc.GetElementsByTagName("FirstName");
        XmlNodeList _lnames = _doc.GetElementsByTagName("LastName");
        // I'm assuming every FirstName has a LastName in this example, your requirements may vary. //
        for (int _i = 0; _i < _fnames.Count; ++_i)
        {
            YourMethod(_fnames[_i].InnerText,
            _lnames[_i].InnerText);
        }
        public static void Main(String[] args)
        {
            XMLApp _app = new XMLApp();
            // Passing XML text as a String, you can also use the
            // XMLDocument::Load( ) method to read the XML from a file.
            //
            _app.ProcessXML(@" <Authors>
            <Author>
              <FirstName>John</FirstName>
              <LastName>Doe</LastName>
            </Author>
            <Author>
              <FirstName>Shahzad</FirstName>
              <LastName>Khan</LastName>
            </Author>
            </Authors> ");
        }
    }// end XMLApp
}
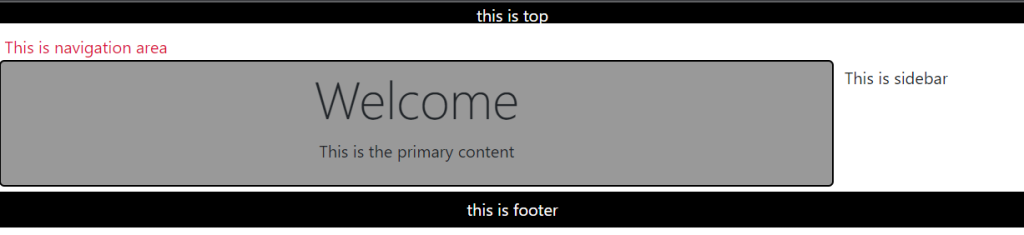
2 column layouts are rather popular on the web, and there are 1,001 ways to make them work. The approach you choose really depends on the type of content you have, and how you want images and backgrounds to work. What I’ll show is the Razor _Layout and CSS to achieve the following look:
The Razor _Layout file can rely on partial views to handle each of the primary sections: top, navigation, sidebar, and footer. RenderBody will produce the primary content area.
A quick note on Html.Partial. If any sections, like the sidebar and navigation sections, require some logic or model information to build their piece of the UI, then use Html.Action instead of Html.Partial. Html.Action allows you to setup a little sub-request inside the current request and allow a controller action to build a model and select a view.
The CSS coming up assumes each partial view will render inside an element with an id matching it’s purpose (so the _top view renders a div with an id of top).
The trick is to use absolute positioning on the sidebar content, which is possible because we know the exact amount of space taken by the 2 sections at the top of the page, and we know the exact width of the content area (it is set explicitly in the CSS). You’ll probably want to give the body more space than the 300px given in the sample above (which was constrained so the screenshot would fit on this page).
This post will show you how to create graphics using free Microsoft Expression Design 4 tool.
So, we want to crate two kind of graphics:
With fixed background color
With transparent background color
First of all, I would like to mention that this tool is for creating vector graphics. Why it is so important? Well, if you create something for instance for 99×99 px and then rescale it to 300×300 px, quality of the graphics would be unchanged. So lets start.
Case 1: Create the same graphics in different resolution with specific background color
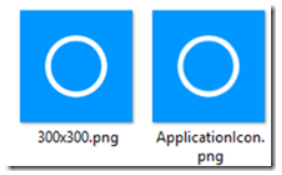
First target is to create two same graphics in png format in different resolutions. We want to create:
ApplicationIcon.png which need to be 99×99 pixels (to fit to all WP resolutions)
300×300.png for Catalogue Image on the Windows Phone Store
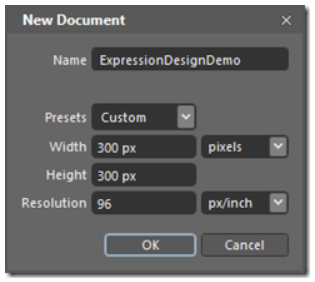
First we will create new project:
You can use various tools in Expression Design to make your vector graphics or you can import some image (File –> Import Image…) and draw over it. In that case B-Spline would be very helpful tool.
Detailed steps would be:
Create main rectangle
Draw graphic with Expression Design tools
Create slice and set slice properties
Export graphics into files
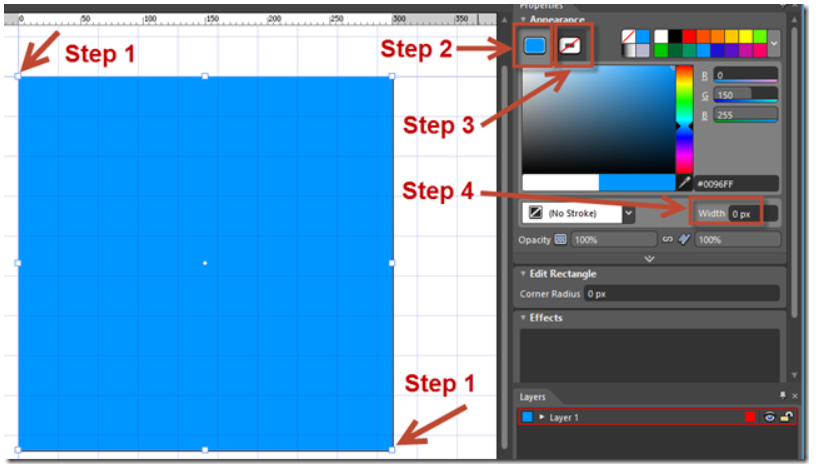
Create main rectangle
First, you need to draw rectangle in full space of the created document 300x300px. Use Rectangle tool and drag rectangle from left upper corner to the right down corner of the document border.
Step 1: Draw rectangle
Step 2: Choose Fill color
Step 3: Choose No Stroke (we don’t need boxed rectangle)
Step 4: Put zero Width for rectangle
Fill color can be any color that you want. Later you can change it to desired color on no color (transparent – more details later).
Draw graphic with Expression Design tools
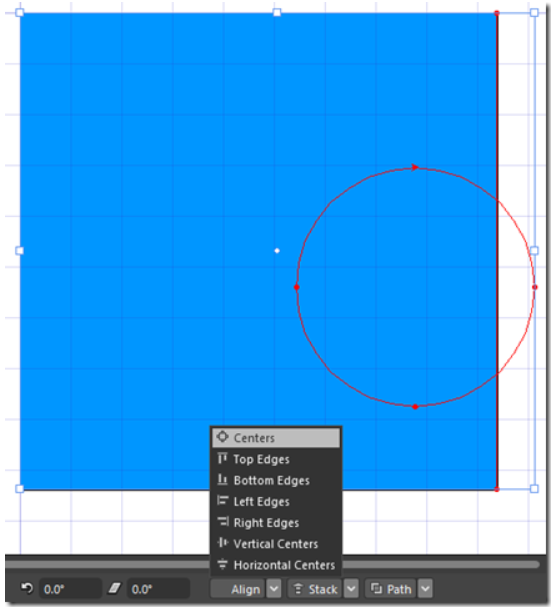
Now we need to draw some wonderful drawing that represent Windows Phone app. We will draw just one white circle with 15px width in the middle of the blue rectangle (Let your imagination do the rest when creating graphics for you app).
Tips: If you want to align object to another object you need to know that Expression Design use Z-order. So, you can’t do tricks with selecting one object1 (rectangle) first and then object2 (circle) second and hoping that circle would be center aligned with rectangle. The point is that top object would be the main. You need to send circle back (right click on circle and then use Arrange –> Send to Back). Then use Align –> Centers and rearrange order again by sending blue rectangle back.
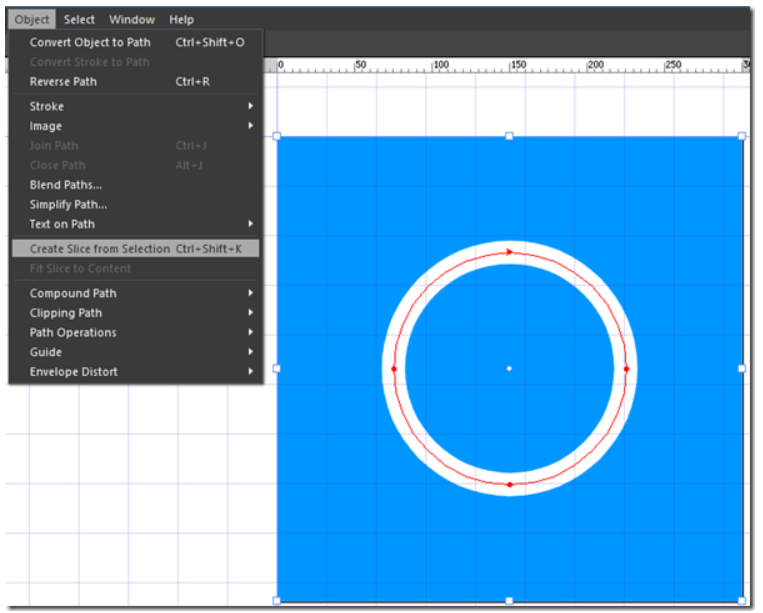
After using tips recommendation we’ll get final drawing:
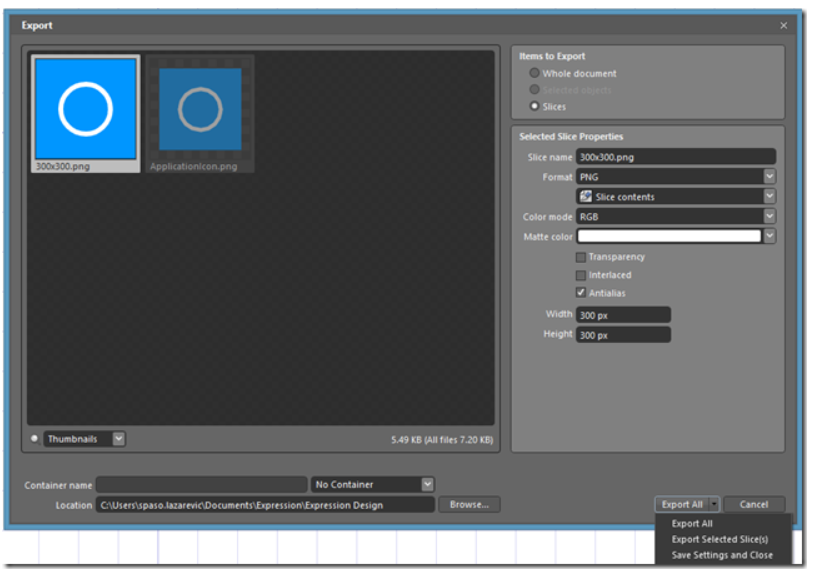
Create slice and set slice properties
After we create graphics we need to export it as png or jpg files. So, the next step is to create Slice from the selection. Select full rectangle and use Ctrl+Shift+K or use Object menu and Crate Slice from Selection.
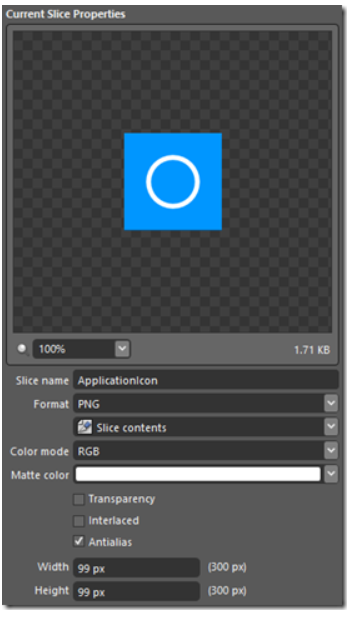
Then we need to set slice properties such as slice name, format and final width and height.
After this, we can use the same procedure to select whole document again, create new slice and set parameters for 300×300 px slice with name 300×300.png.
Export graphics into files
And finally, we need to export slice to png file. For that purpose use Export item from File menu item. Choose desired location and if you have more slices use Export All item in right-down corner.
And that’s it, we just created two png files for our app with blue color as background with two sizes.
Case 2: Use transparent background
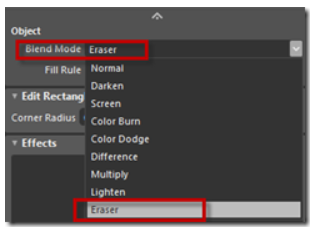
But what if you want to create ApplicationIcon for you app and use background color as transparent. So when use different Accent color on your phone background change to that accent color, not fixed blue color as in our first example.
The trick is before creating slice we need to select blue rectangle and set it as Eraser.
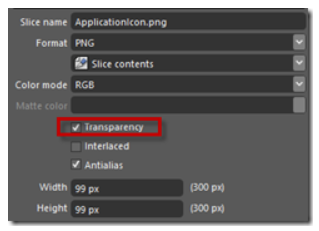
Then use standard procedure to create slice with Ctrl+Shift+K and in slice properties set to use Transparent (check box).
And that is all. Export this graphic and you’ll get ApplicationIcon with transparent background.
Remarks: only png file can be transparent, not jpg files.
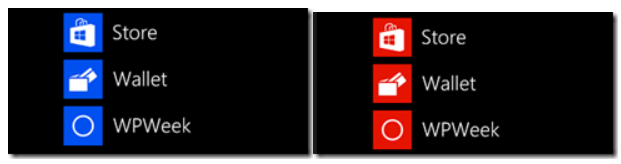
As a result if we change accent color, our background would change appropriately:
And that is all. Install Microsoft Expression Design 4.0 and be author of graphics for your apps.