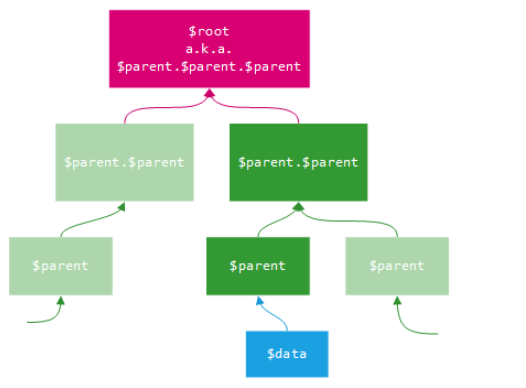
$parent: This is the view model object in the parent context, the one immeditely outside the current context.
$root: This is the main view model object in the root context, i.e., the topmost parent context. It’s usually the object that was passed to ko.applyBindings. It is equivalent to $parents[$parents.length - 1].
$data: This is the view model object in the current context. In the root context, $data and $root are equivalent.
You’ll only see a practical difference if you have view models nested more than one level, otherwise they will amount to the same thing.
It benefit is rather simple to demonstrate:
var Person = function(name) {
  var self = this;
  self.name = ko.observable(name);
  self.children = ko.observableArray([]);
}

var ViewModel = function() {
  var self = this;
  self.name = 'root view model';
  self.mainPerson = ko.observable();
}

var vm = new ViewModel(),
    grandpa = new Person('grandpa'),
    daddy = new Person('daddy'),
    son1 = new Person('marc'),
    son2 = new Person('john');

vm.mainPerson(grandpa);
grandpa.children.push(daddy);
daddy.children.push(son1);
daddy.children.push(son2);

ko.applyBindings(vm);
The key to understanding this is understanding that isMessageHidden is not a boolean value, but an observable which stores a boolean value. If we simply refer to this observable by name in our data-binding code, then knockout will infer that we want to retrieve the stored value. However, if we wish to refer to the stored value within a statement, such as !isMessageHidden(), then the parentheses are required in order to indicate that we want the stored value and not the observable itself. This tripped me up a few times when I was learning Knockout.
I love Bootstrap Icons. It has a large selection of quality icons and it’s open source so can be used for free (subject to license terms and conditions).
The simple way to use the icons on your website is to use the web font, but that means you are including all 1,800 plus icons (as of v1.10), albeit the file is a reasonable 120kb.
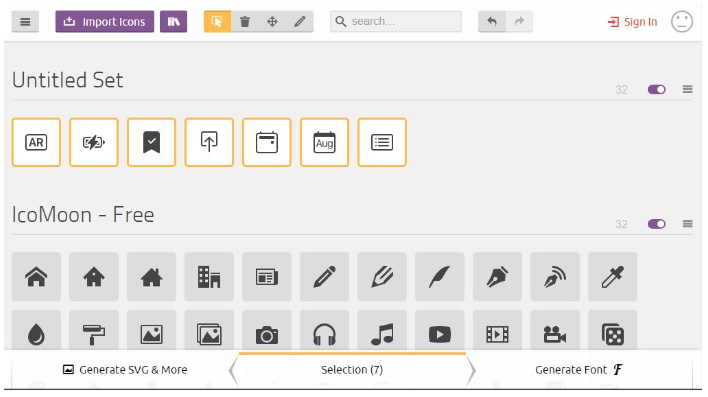
But using a free online tool, you can create your own web font with just the icons you need.
Press Import Icons (near top left of page) and select all of the icon SVG files that you want in your font.
You can either add files one at a time or you can select multiple files at once.
Once you proceed, your selected icons will appear as “Untitled Set”. You still need to highlight each of your icons to select them so that they get included in your custom web font. You can select one at a time or multiple select or select all.
Next step is to press Generate Font (bottom right of page). This will show details of your new font and expose a Download button so you can download a ZIP file containing what you need.
The ZIP file has style.css which you will need to include or better still, add to your HTML template or existing style sheet.
There is also a fonts folder which you will need to copy to your website as it contains the actual web font.
Lastly, there is demo.html which contains examples of how to include your chosen icons in your HTML.
The icon classes are named icon- and then the file name without extension. So you would typically use as follows:
<span class="icon-check2"></span>
To use these fonts in ASP.NET Core, Add them to wwwroot -> lib folder (create a new folder). Open _Layout.cshtml view in Shared folder and add this line in header;