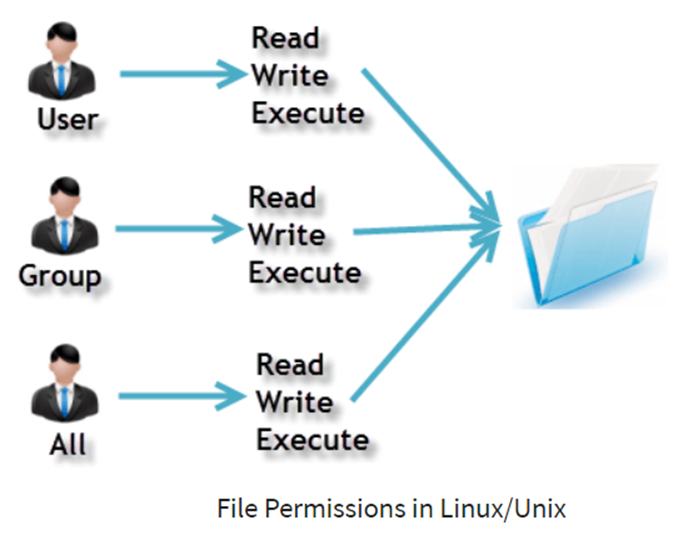
Linux is UNIX clone. For effective security, Linux divides authorization into 2 levels, Ownership and Permission.
Every file and directory is assigned 3 types of owner; User, Group and Other.
- User is the owner of the file. By default, the person who creates a file becomes its owner. A logged-in user sometimes called an owner.
- A user-group can contain multiple users. All users belonging to a group can have similar permissions. In this case the ownership belong to a group.
- Other means setting permissions to the world. This person has neither create a file, nor belongs to a user group.
How Linux distinguish between these three users? This is where permissions comes in. Permission defines the user behavior.
Every file and directory has 3 permissions defined for 3 owners.
- Read permission gives the authority to open and read a file. Read permission on directory gives the ability to lists its content.
- Write permission gives the authority to modify the contents of a file. The write permission on a directory gives the authority to add, remove and rename files. Consider a scenario where you have to write permission on file but do not have write permission on the directory where the file is stored. You will be able to modify the file contents. But you will not be able to rename, move or remove the file from the directory.
- Execute permission gives the authority to execute a program. In Windows, an executable program usually has an extension “.exe” and which you can easily run. In Unix/Linux, you cannot run a program unless the execute permission is set. If the execute permission is not set, you might still be able to see/modify the program code (provided read & write permissions are set), but not run it.
To summarize this, the Owner assigned permissions on every File and Directory.
Some Examples
ls -l

The highlighted “-rw-rw-r–“ code is the one that tells us the permission given to owner, group or the world.
The first ‘–‘ tells us that we have selected a file.
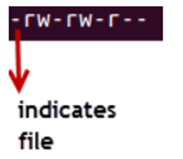
If this were a directory, d would be shown here;

The characters are pretty easy to remember.
r = read permission
w = write permission
x = execute permission
– = no permission
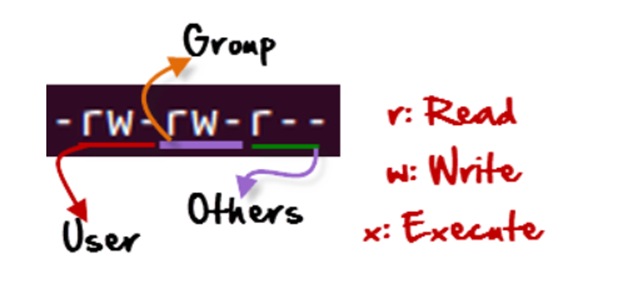
Let’s read and understand our sample file;
The first part of the code is ‘rw-‘. This is for the user. This tells us that the user can:
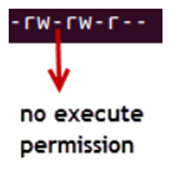
- Read the file
- Write or edit the file
- He cannot execute the file since the execute bit is set to ‘-‘.
The second part is ‘rw-‘. This is for the user group for example ‘Home’. Group-members can:
- Read the file
- Write or edit the file
The third part is for the world which means any user. It says ‘r–‘. This means the user can only:
- Read the file
Changing file/directory permission using ‘chmod’ command
To restrict user access (owner, group and the world) to files and folders we will use permissions (read, write, execute) using chmod (change mode) command.
chmod permissions filenameWe can use Absolute (Numeric) mode or Symbolic mode to do this.
In Absolute mode, file permissions are not represented as characters but three-digit octal number. Here is a table that shows all possible permission types.
| Number | Permission Type | Symbol |
| 0 | No Permission | — |
| 1 | Execute | –x |
| 2 | Write | -w- |
| 3 | Execute + Write | -wx |
| 4 | Read | r– |
| 5 | Read + Execute | r-x |
| 6 | Read +Write | rw- |
| 7 | Read + Write +Execute | rwx |
Some Example
Checking current file permission;

chmod 764 and checking permission again;
chmod 764 MySmpleFile.txt
764 absolute code means;
Owner can read, write and execute (7). Usergroup can read and write (6). World can only read (4). This is shown as ‘-rwxrw-r–. In this mode we change permission for all 3 owners.
In Symbolic mode we change permissions of specific owner. It uses mathematical symbols.
| Operator | Description |
| + | Adds permission to a file or directory |
| – | Removes the permission |
| = | Sets the permission and overrides earlier permissions set |
The owners are represented as;
| u | user/owner |
| g | group |
| o | other |
| a | all |
Permission is set using characters like rwx. Here is an example;
Reset permission for this step;
chmod 664 MySmpleFile.txtCurrent file permission

Setting permission to ‘other users’ AKA ‘world’ users
chmod o=rwx MySmpleFile.txt
Adding ‘Execute’ permission to usergroup.
chmod g+x MySmpleFile.txt
Removing ‘read’ permission for ‘user’
chmod u-r MySmpleFile.txt
For changing ownership and group of a file/directory, we use this command;
chown user filenameIf we want to change the user and group for a file / directory, we use this command;
chown user:group filenameHere are examples;
Reset permission for this step;
chmod 664 MySmpleFile.txtCheck the current file ownership

Change file owner to pihole.
chown tanolis MySmpleFile.txt
Change file group to tanolis

In case, you don’t have the group, use this command to create one;
groupadd tanolischange user and group back to root

In case we want to change group-owner only, we use this command;
chgrp group_name filename‘chgrp’ stands for change roup.
Check current file group owner

Change the group owner to tanolis

Some key commands
The file /etc/group contains all the groups defined in the system
cat /etc/group
You can use the command “groups” to find all the groups user is member of.
You cannot have 2 groups owning the same file.
You do not have nested groups in Linux. One group cannot be sub-group of other
x- eXecuting a directory means Being allowed to “enter” a dir and gain possible access to sub-dirs.