protected string GetCalimValue(string token)
{
   var handler = new JwtSecurityTokenHandler();
   var jsonToken = handler.ReadToken(token);
   var tokenJWT = jsonToken as JwtSecurityToken;
   //var jwtSecurityToken = handler.ReadJwtToken(token);

   var jti = tokenJWT.Claims.First(claim => claim.Type == "jti").Value;
   return jti;
}
Validating and Decoding JWT Token and return value;
protected string ValidateTokenAndGetClaimValue(string token)
{
    string secret = "this is a string used for encrypt and decrypt token";
    var key = Encoding.ASCII.GetBytes(secret);
    var handler = new JwtSecurityTokenHandler();
    var validations = new TokenValidationParameters
    {
        ValidateIssuerSigningKey = true,
        IssuerSigningKey = new SymmetricSecurityKey(key),
        ValidateIssuer = false,
        ValidateAudience = false
    };
    var claims = handler.ValidateToken(token, validations, out var tokenSecure);

    var tokenJWT = tokenSecure as JwtSecurityToken;
    var emailAddress = tokenJWT.Claims.First(claim => claim.Type == "email").Value;
    return emailAddress;
}
We want to keep token inside cookies on a successful token acquisition;
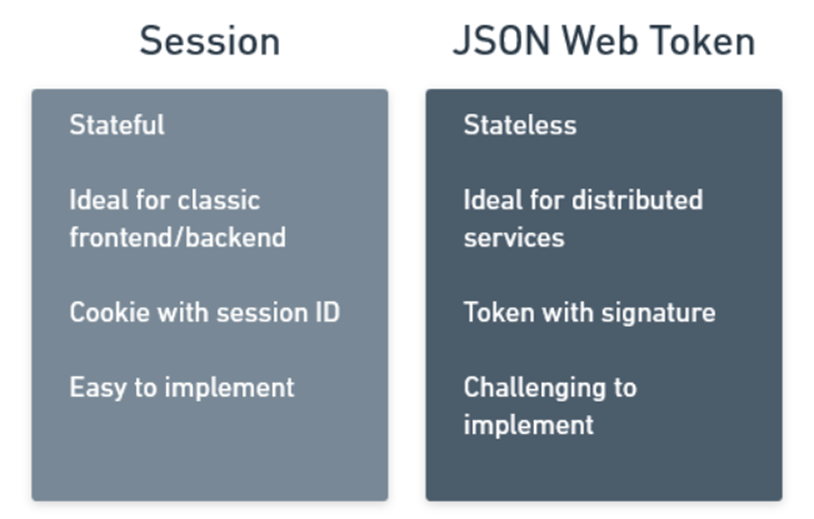
JSON Web Token (JWT) is a standard RFC 7519 for exchanging cryptographically signed JSON data. It is probably the most popular current standard of authorization on the web, especially when it comes to microservices and distributed architecture.
As a developer, when you are asked to implement a modern web application, you may need to break it down into independent services. Independent services and distributed architecture have many advantages. One thing that you will need to think about is how your services will know that users are allowed to use them.
With stateful session management, your solution would be to create a user session that is shared among all parts of the system. But with a growing distributed system, sharing a session can be quite challenging.
The alternative to stateful session management is passing a stateless JSON Web Token which will represent an access token or an identity token. It will hold claims that allow your services to authorize their users and it will use the magic of cryptography to ensure that the token is authentic and has not been tampered with.
This way your services don’t need to share a stateful session, they only need to trust the token that they are given.
Standard Sessions
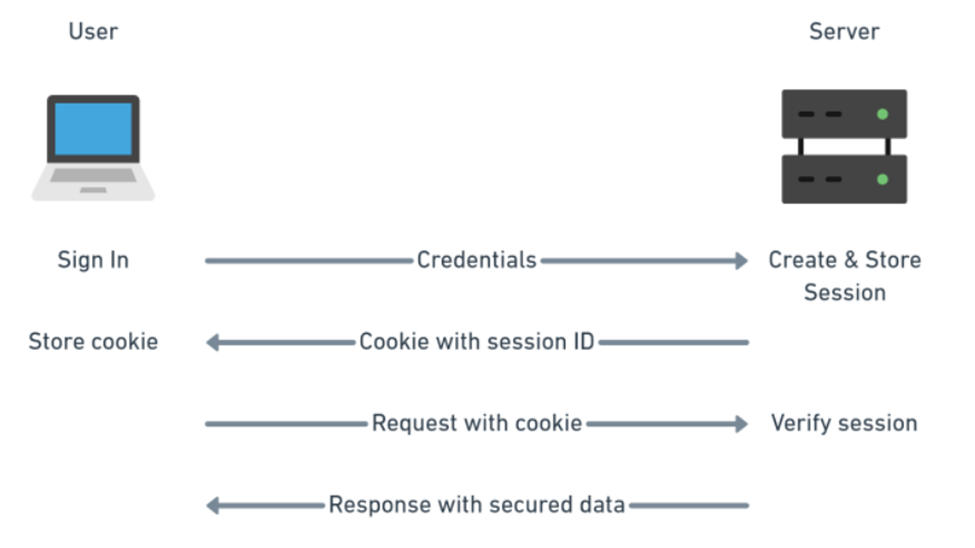
If you have been around for a while like me, you know that the standard approach on the web has been the use of session and session-based cookies.
Users would sign in with their credentials and the server would give them back a cookie with their session ID. That cookie is then sent by the user with every request to authorize the user.
Nowadays that process is so automated that you barely need to write any code to support it and browsers know to automatically send the session cookie with every request themselves. it is super convenient.
The above diagram should feel fairly familiar and simple and it is what websites have been doing for a long time.
For a simple website, it is far easier to implement standard session management which is well supported by libraries on the server, and cookie management in the browser.
What is JWT?
JWT is simply a signed JSON intended to be shared between two parties. The signature is used to verify the authenticity of the token to make sure that none of the JSON data were tampered with. The data of the token themselves are not encrypted.
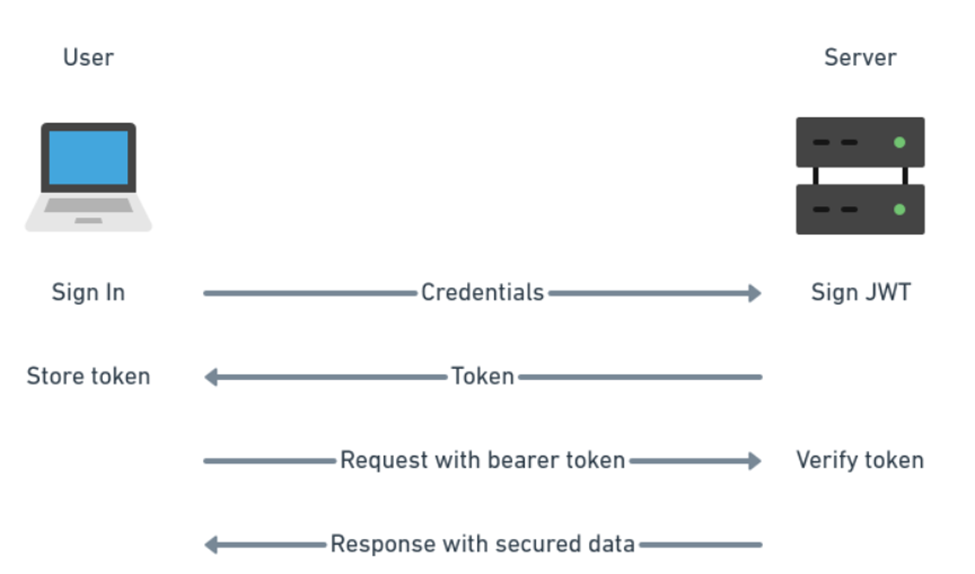
The method of authenticating users does not change with JWT. You can still use a user name and password (although you should use something more secure like two-factor authentication or DID Auth). The difference is only in how you manage the user authorization (how you let your service know that the user has permission to do something).
On the server, you verify the token signature and get access to the JSON data directly which is much simpler for distributed architectures.
In your web application frontend, your code needs to manage how the token is stored in the browser (cookie, session storage, or local storage) and how it is passed with requests to the server (as authorization bearer header).
If you compare the diagrams for session-based authorization and JWT, you will notice that the principle is very similar. The main reason for using JWT is for the client-server communication to remain stateless.
JWT gained popularity because statelessness made it easier to design independent services without having to deal with shared session management.
Where to store the JWT token in the browser?
You have three options here really. You either use cookies, web storage, or in memory. The most commonly used option seems to be local storage.
JWT in a cookie
Cookies have the advantage that they are automatically sent together with each request so you don’t need to deal with the authorization header.
Cookies are still open to Cross-Site Request Forgery (CSRF)attacks because of which you should also implement CSRF tokens. CSRF token is a random string sent as a cookie with each request and it is different for each request.
You should also use httpOnly flag to make the cookie available only server-side. A cookie with the HttpOnly attribute is inaccessible to the JavaScript document.cookie API; it is sent only to the server.
A cookie with the Secure attribute is sent to the server only with an encrypted request over the HTTPS protocol (however, on localhost only, you can still use HTTP).
JWT in web storage: Local storage vs session storage
The difference between these two is that local storage is more permanent. Session storage is cleared when the user closes the website window. Local storage data have to be explicitly deleted.
Unlike cookies, local storage is sandboxed to a specific domain and its data cannot be accessed by any other domain including sub-domains. But remember that you are still vulnerable to Cross-Site Scripting (XSS). Both cookie and web storage solutions are vulnerable to XSS.
Local storage is used the most in JWT implementations. However, session storage is the more secure option here.
With localStorage JWT is not passed with each request automatically, and you need to pass it to the server through an authorization header yourself.
JWT in memory
The most secured solution here is to store JWT in memory of your single-page application. This means that you end up storing the token in a variable in JavaScript without additional persistence.
This comes with some limitations. You cannot implement a single-sign-on (SSO) and each tab or open window in a browser will require its own sign-in because JavaScript memory is not shared. However, the sharing issue can be worked around by the use of a refresh token.
This solution is of course still vulnerable to Cross-Site Scripting like all the other solutions.
If you are building a standard frontend/backend website, use standard session management. If you are building distributed system with services, implement JWT authorization.
What are the do’s and don’ts about Cache VS Session VS Cookies?
For example: I’m using Session variables a lot and sometimes have problems in a booking-application when users start to order products and then go to lunch and come back some hours later and continue the booking. I store the booking in the session until the user confirms or aborts the booking so I don’t need to talk to the database and handle halfway bookings in the database when users just click the X in the browser and never comes back.
Should I instead use cache or cookies or some combination for this?
(Also when there is some error in the app, the session-object resets itself and I get more problems because of that)
I’m mostly doing desktop-programming and feel I lack lots of knowledge here so anyone who can expand on where to use Cache, Session, Cookies (or db) would be appreciated
Solution
The combination of DB and cookies solves the problem;
I have to store the booking in the database connected to a session-id
Store the session-id in a cookie (encrypted). By default Session Timeout is 20 minutes that can be adjusted.
Every page load checking the cookie and fetch the booking from the database
I have a clean-up procedure that runs once a week that clears unfinished bookings.
I can’t store the booking as a cookie because then the user can change prices and other sensitive data and I had to validate everything (can’t trust the data).
Where did the “\” goes? Since this is a part of escape characters so JS automatically removes “\\” and replaced it with “_”. “\b” is a metacharacter so it’s gone as well.
We can fix it by using Replace command on ViewBag.
We want to pass some data from jQuery to ASP.NET Core / MVC. We have an action method “AddEmployee” in Home controller and we want to pass input values to the controller.
$(document).ready(function () {
        $("#btnSave").click(function () {
            var formData = new FormData();
            //Reading text box values using Jquery)
            formData.append('Name', $("#txtName").val();
            formData.append('City',$("#txtAddress").val());
            formData.append('Address',$("#txtcity").val());
            $.ajax(
            {
                type: "POST", //HTTP POST Method
                url: "Home/AddEmployee", // Controller/View
                //url: '@Url.Action("AddEmployee", "Home")',
                data: { //Passing data
                    formData
                },
                //cache: false,
                //processData: false,
                //contentType: false,

                success: function (data) {
                    alert("success...any incoming data");
                },
                failure: function (data) {
                    alert("failure....");
                }
            });
        });
    });
Alternatively we can have seperate functions for success and failure actions;
function btnSaveSuccess(data)
{
  alert('success');
}

function btnSaveFailure(data)
{
  alert('failure');
}

We can call these functions in btnSave main function sucess/failure blocks.
To work with jQuery we need to reference of jQuery library .You can use following CDN jQuery libraryfrom any provider such as Microsoft,Google or jQuery .