Upgrading cloud key sucks but works. After upgrade log in to unifi ui. You would see blue lights back on. Disable system-d. Check if dnsmasq is working, if not try to install resloveconf package.
Login to your cloud key and make sure its working (blue lights :))
DNS resolution will not work. The problem is pihole unbound resolution. Add these lines to /etc/resolveconf.conf
nameserver 8.8.8.8
nameserver 8.8.4.4
check the status of dnsmasq;
#disable systemd-resolved first
sudo systemctl stop systemd-resolved
sudo systemctl disable systemd-resolved
sudo systemctl status dnsmasq
sudo systemctl status dnsmasq
If dnsmasq is running, proceed. don’t restart. reinstall pihole and restore from backup. Follow these after pihole installation (couldn’t find an easier solution);
#Reconfigure lighttpd port (for example 8080)
nano /etc/lighttpd/lighttpd.conf
#Restart lighttpd
/etc/init.d/lighttpd restart
#Change the pi-hole random password to your liking
pihole -a -p
Pi-hole has dnsmasq embedded in pihole-FTL, and a separate dnsmasq on the host is not required and causes problems as you have discovered.
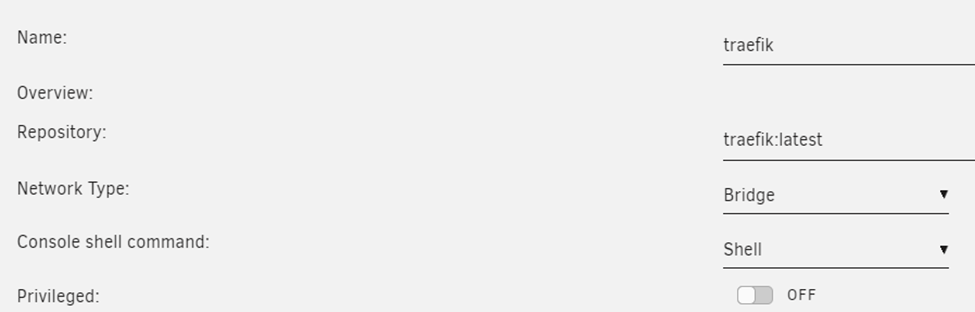
This is a basic Traefik setup. Follow these steps to setup Traefik as reverse proxy on unRAID.
We will be using Traefik 2.x as reverse proxy on unRAID v 6.9.x. we will be setting up unRAID ui and Traefik dashboard to show traffic can be routed to any container running on unRAID.
DNS records configuration
We need to create DNS records, all pointing to unRAID box. We will be using unRAID default “local” domain running on 192.168.1.20. Since we own foo.com domain so our DNS records would be;
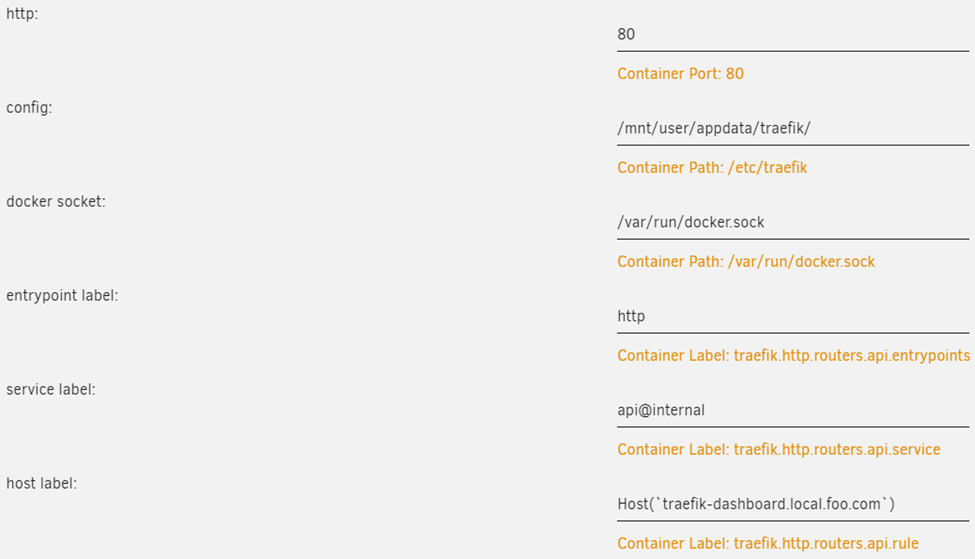
Add a port mapping from 80 → 80, so that Traefik can listen for incoming HTTP traffic.
Add a path where we mount our /mnt/user/appdata/traefik to /etc/traefik so that Traefik can actually read our configuration.
Add another path where we mount our Docker socket /var/run/docker.sock to /var/run/docker.sock. Read-only is sufficient here.
This is required so Traefik can listed for new containers and read their labels, which is used for the dynamic configuration part. We are using this exact mechanism to expose the Treafik dashboard now.
Add a label
• key = traefik.http.routers.api.entrypoints
• value = http

Add another label
• key = traefik.http.routers.api.service
• value = api@internal

And a final label
• key = traefik.http.routers.api.rule
• value = Host(`traefik-dashboard.local.foo.com`)
Our container configuration should look like this;
Run container, and view container log to make sure its running. You will see something like this;
The screen will scroll with new logs. Traefik is up and running.
For external hosts to take advantage of terafik, point their DNS entry to traefik host. Obviously we have to define router and services in traefik dynamic file.