Recently I hit by server memory issue while running SSIS package. I was getting binary data from remote server but the production server was unable to process it because of limited memory.
There are two choices to resolve this. Increase server memory. This wouldn’t solve the problem because the data will grow day by day.
The second is to split the batch into multiple batches say, 300 records per batch. if there are 2000 records then it would be 7 round trips to the remote server to load the data. 6 full 300 and seventh one would be 200.
Here is the design;
I will be using SQL OFFSET FETCH Feature and SSIS Script component for this. For an OLEDB example you can click on the link under Resources.
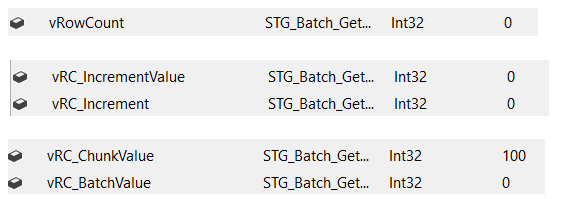
Declare four variables as follows:
1) vRowCount (Int32): Stores the total number of rows in the source table
2) vRC_IncrementValue (Int32): Stores the number of rows we need to specify in the OFFSET
3) vRC_Increment: (Int32): Stores the number of rows we need to specify in this operation
4) vRCChunkValue (Int32): Specifies the number of rows in each chunk of data in this operation
5) vRCBatchValue (Int32): Specifies the number of rows in each chunk of data
After declaring the variables, we assign a default value for the vRC_ChunkValue variable; in this example, we will set it to 100.
Our select query inside Script source component is like this;
string vSqlStatement = $@"
            SELECT *
	     FROM [dbo].[tblSample]
	     WHERE 1=1
            -- get chunks
            ORDER BY SampleID
            OFFSET {Variables.vRCIncrementValue} ROWS
            FETCH NEXT {Variables.vRCBatchValue} ROWS ONLY";
Next, Add an Execute SQL Task to get the total number of rows from source table and change result set property to Single Row;

Assign the return value to vRowCount variable.
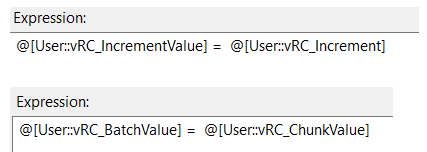
Next, add two expression task to copy values from operating variables to query variables;
Next, Add a For Loop Container, with the following configuration;

Add a data flow task inside For Loop Container. Add a script component and configure it as source;

Configure Data output on Inputs and Outputs tab;
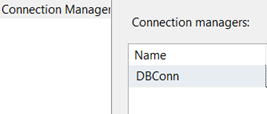
Configure Connection on Connection Manager tab;
Click “Edit Script” and make these changes;
IDTSConnectionManager100 connMgr;
SqlConnection sqlConn;
SqlDataReader sqlReader;
public override void AcquireConnections(object Transaction)
{
//base.AcquireConnections(Transaction);
connMgr = this.Connections.GoldenConn;
sqlConn = (SqlConnection)connMgr.AcquireConnection(null);
}
public override void ReleaseConnections()
{
//base.ReleaseConnections();
connMgr.ReleaseConnection(sqlConn);
}
public override void PreExecute()
{
base.PreExecute();
//create sql statement
string vSqlStatement = $@"
SELECT *
FROM [dbo].[tblSample]
WHERE 1=1
-- get chunks
ORDER BY SampleID
OFFSET {Variables.vRCIncrementValue} ROWS
FETCH NEXT {Variables.vRCBatchValue} ROWS ONLY";
//MessageBox.Show(vSqlStatement);
SqlCommand cmd = new SqlCommand(vSqlStatement, sqlConn);
/*
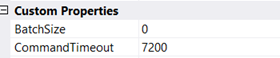
7200 sec = 120 min = 2 hours. This can be set to 0 for non timeout at all
Will this work? It also depends on server timeout settings. In most SQL install, SQL default timeout for remote queries is 600 seconds, 10 minutes.
*/
cmd.CommandTimeout = 7200;
sqlReader = cmd.ExecuteReader();
}
public override void PostExecute()
{
base.PostExecute();
sqlReader.Close();
}
public override void CreateNewOutputRows()
{
try
{
while (sqlReader.Read())
{
{
SampleDataBuffer.AddRow();
SampleDataBuffer.SampleID = sqlReader.GetString(0);
SampleDataBuffer.AddDate = sqlReader.IsDBNull(7) ? null : sqlReader.GetString(7);
}
}
}
catch (Exception ex)
{
//set to true to cause execution to abort
bool cancel = false;
//raise the error event to SSIS
ComponentMetaData.FireError(-1, "CreateNewOutputRows()", ex.Message, "", -1, out cancel);
}
}
Next, Add Script task inside For Loop container to calculate remaining rows;

Edit Script and add this;
// make sure all rows are accounted for
int rowCount = (int)Dts.Variables["User::vRowCount"].Value;
int rowIncrement = (int)Dts.Variables["User::vRC_Increment"].Value;
int rowChunkValue = (int)Dts.Variables["User::vRC_ChunkValue"].Value;

//this is our new offset value
rowIncrement = rowIncrement + rowChunkValue;
Dts.Variables["User::vRC_IncrementValue"].Value = rowIncrement;

//calculate remaining rows
int remainingRows = rowCount - rowIncrement;
//MessageBox.Show($"RowCount: {rowCount}\nRowIncrmenet: {rowIncrement}\nRowChunkValue{rowChunkValue}\nRemainingRows{remainingRows}");
if ((remainingRows <= rowChunkValue))
{
      //short circuit
      Dts.Variables["User::vRC_BatchValue"].Value = remainingRows;
      //for loop assign expression is [@vRC_Increment = @vRC_Increment + @vRC_ChunkValue], let's reverse this for last loop iteration
      Dts.Variables["User::vRC_Increment"].Value = rowIncrement - rowChunkValue;
}
Hope this will help.
Resources