I am assuming that you already have an Excel file with one “Sheet1” data table in it. Microsoft ACE driver is already installed;
Standard syntax to query Excel table is “SELECT * FROM [Sheet1$]”. Here is the code that does the magic.
// Connect EXCEL sheet with OLEDB using connection string
 using (OleDbConnection conn = new OleDbConnection(connectionString))
    {
        conn.Open();
        OleDbDataAdapter objDA = new System.Data.OleDb.OleDbDataAdapter
        ("select * from [Sheet1$]", conn);
        DataSet excelDataSet = new DataSet();
        objDA.Fill(excelDataSet);
        dataGridView1.DataSource = excelDataSet.Tables[0];
    }

	//In above code '[Sheet1$]' is the first sheet name with '$' as default selector,
        // with the help of data adaptor we can load records in dataset

	//write data in EXCEL sheet (Insert data)
 using (OleDbConnection conn = new OleDbConnection(connectionString))
    {
        try
        {
            conn.Open();
            OleDbCommand cmd = new OleDbCommand();
            cmd.Connection = conn;
            cmd.CommandText = @"Insert into [Sheet1$] (month,mango,apple,orange)
            VALUES ('DEC','40','60','80');";
            cmd.ExecuteNonQuery();
        }
        catch (Exception ex)
        {
            //exception here
        }
        finally
        {
             conn.Close();
             conn.Dispose();
        }
    }

//update data in EXCEL sheet (update data)
using (OleDbConnection conn = new OleDbConnection(connectionString))
	{
        try
        {
            conn.Open();
            OleDbCommand cmd = new OleDbCommand();
            cmd.Connection = conn;
            cmd.CommandText = "UPDATE [Sheet1$] SET month = 'DEC' WHERE apple = 74;";
            cmd.ExecuteNonQuery();
        }
        catch (Exception ex)
        {
            //exception here
        }
        finally
        {
            conn.Close();
            conn.Dispose();
        }
    }
$ in select statement means that table already exists in Excel File. If we are going to create a new worksheet then we will not use $ sign. OLEDB does not support DELETE query.
I had an Excel file with a single column of 6000 characters (huge text). I used ACE drive and SSIS Build-in Excel connection manager.
The package worked initially with huge text configuration. I removed all the content from column and added three characters for testing. The package started failing.
Status Failed-SSIS Error Code DTS_E_OLEDBERROR. An OLE DB error has occurred. Error code: 0x80040E21. An OLE DB record is available. Source: "Microsoft Access Database Engine" Hresult: 0x80040E21 Description: "Multiple-step OLE DB operation generated errors. Check each OLE DB status value, if available. No work was done.".

Status Failed-Failed to retrieve long data for column "SQLStatement".
Status Failed-There was an error with Excel - Get worksheet detail data.Outputs[Excel Source Output] on Excel - Get worksheet detail data. The column status returned was: "DBSTATUS_UNAVAILABLE".

Status Failed-SSIS Error Code DTS_E_INDUCEDTRANSFORMFAILUREONERROR. The "Excel - Get worksheet detail data.Outputs[Excel Source Output]" failed because error code 0xC0209071 occurred, and the error row disposition on "Excel - Get worksheet detail data" specifies failure on error. An error occurred on the specified object of the specified component. There may be error messages posted before this with more information about the failure.
Why?
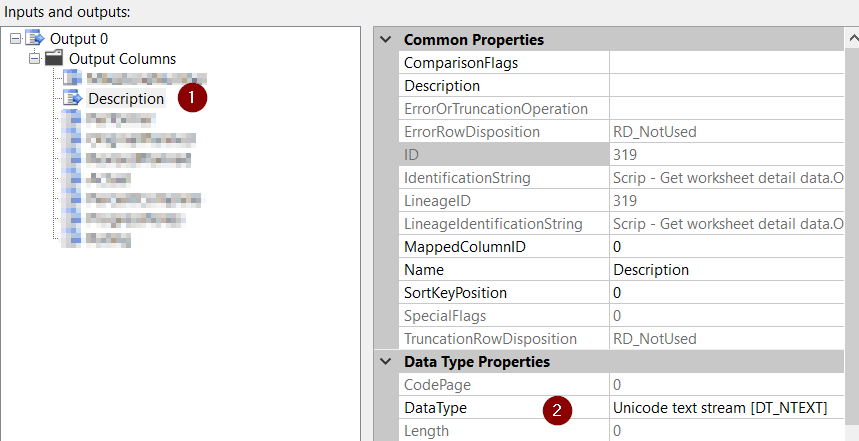
For some strange reasons, SSIS Built-in Excel connection manager doesn’t respect the variation of content. If the content size is less than 100 and we have configured as Unicode text stream [DT_NTEXT], it will blow up.
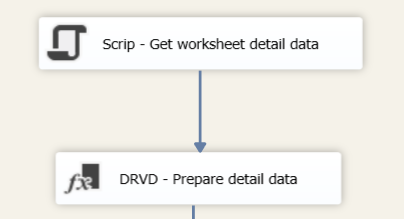
The work around is use Script Component and use it as source.
Add a column to Output column of Output buffer;
Click on Edit Script and add paste following code;
public class ScriptMain : UserComponent
{
    DataSet excelDataSet;

    public override void PreExecute()
    {
        base.PreExecute();
        string connString = $"Provider=Microsoft.ACE.OLEDB.12.0;Data Source=C:\myExcelFile.xlsx;Extended Properties=Excel 12.0";
        //Connect Excel sheet with OLEDB using connection string
        using (OleDbConnection conn = new OleDbConnection(connString))
        {
            conn.Open();
            OleDbDataAdapter objDA = new OleDbDataAdapter("SELECT * FROM [Portfolio$A10:I] WHERE Performer IS NOT NULL", conn);
            excelDataSet = new DataSet();
            objDA.Fill(excelDataSet);
        }
   public override void CreateNewOutputRows()
    {
         DataTable tbl = excelDataSet.Tables[0];
        foreach (DataRow row in tbl.Rows)
        {
            Output0Buffer.AddRow();          Output0Buffer.Description.AddBlobData(Encoding.Unicode.GetBytes(row[0].ToString()));
        }
    }
Open your Excel file and add a lot of data, for example 6000 characters, in Description column. The package will run successfully.
Again open your Excel file and add merely 3 characters in Description column. The package will run successfully again.
The success reason, We are not using Built-in Excel connection manager and are not affected by the weird behavior.
These solutions are from Microsoft Social Site;
This one seems to be a workable solution. These are pre-requisite for this approach;
ACE drive installation
Running following commands. Make sure you know the risk because these are related to security configuration of your database server.
sp_configure 'show advanced options', 1;
GO
RECONFIGURE;
GO
sp_configure 'Ad Hoc Distributed Queries', 1;
GO
RECONFIGURE;
GO
USE [master]
GO

--if using 32 bit office
EXEC master.dbo.sp_MSset_oledb_prop N'Microsoft.ACE.OLEDB.12.0', N'AllowInProcess', 1
--if using 64 bit office
EXEC master.dbo.sp_MSset_oledb_prop N'Microsoft.ACE.OLEDB.16.0', N'AllowInProcess', 1
GO

--if using 32 bit office
EXEC master.dbo.sp_MSset_oledb_prop N'Microsoft.ACE.OLEDB.12.0', N'DynamicParameters', 1
--if using 64 bit office
EXEC master.dbo.sp_MSset_oledb_prop N'Microsoft.ACE.OLEDB.16.0', N'DynamicParameters', 1
GO
We can package following stored procedure and call it from SSIS.
DECLARE @tbl TABLE (
col1 VARCHAR(50)
, col2 VARCHAR(50)
, col3 VARCHAR(50)
, col4 VARCHAR(MAX)
);
INSERT INTO @tbl
SELECT *
FROM OPENROWSET('Microsoft.ACE.OLEDB.12.0',
'Excel 12.0 Xml; HDR=NO;
Database=c:\Users\Yitzhak\Documents\dada.xlsx',
[data$]);
-- just to test
SELECT * FROM @tbl;
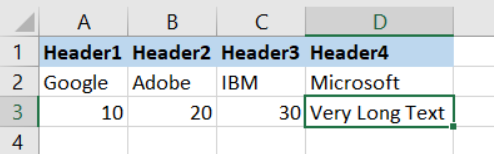
Output
-------
col1 col2 col3 col4
Header1 Header2 Header3 Header4
Google Adobe IBM Microsoft
10 20 30 Very Long Text
These are alternative approaches just for reference;
Metadata at the Excel Source component’s output (checked using Advanced Editor): DT_NTEXT
Derived Column component between source and destination to cast to non-unicode from unicode using (DT_TEXT,1252)
Metadata at the OLE DB Destination component’s input (checked using Advanced Editor): DT_TEXT
Target Column data type: VARCHAR(MAX)
Another approach
The “IMEX=1” extended property for OLE DB Excel connection string is used when there are mixed data types in one column. In this case, you need to change the value of the TypeGuessRows registry key so that Excel driver scans more than 8 rows (by default) to find a value that is longer than 4000 characters. If the registry key is updated successfully, the data type of the external column should be DT_NTEXT, and the data type of the output column will default to DT_NTEXT other than DT_WSTR automatically. So, I am afraid that you have not modified the registry key successfully.
If the source Excel file is .xls file, the provider used will be Microsoft JET OLE DB 4.0. In this case, we need to modify the following registry key from 8 to 0: HKEY_LOCAL_MACHINE\SOFTWARE\Microsoft\Jet\4.0\Engines\Excel\TypeGuessRows
If the source Excel file is .xlsx file, the provider used will be Microsoft ACE OLE DB 12.0. In this case, we need to modify the proper registry key according to the Office Excel version:
if above will not solve your problem, then the best way to do is:
Suppose you have a column named ‘ColumnX‘ with more than 4000 characters. Then, Load your excel data in a temp table with splitting of ColumnX into two derived columns. I mean to say, split the data of ColumnX into two parts and store it into two columns e.g.
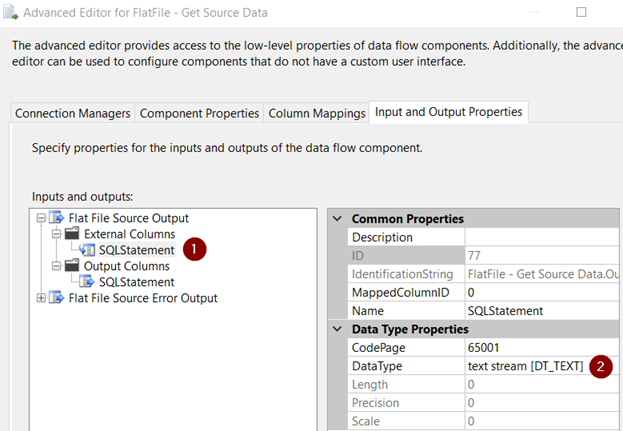
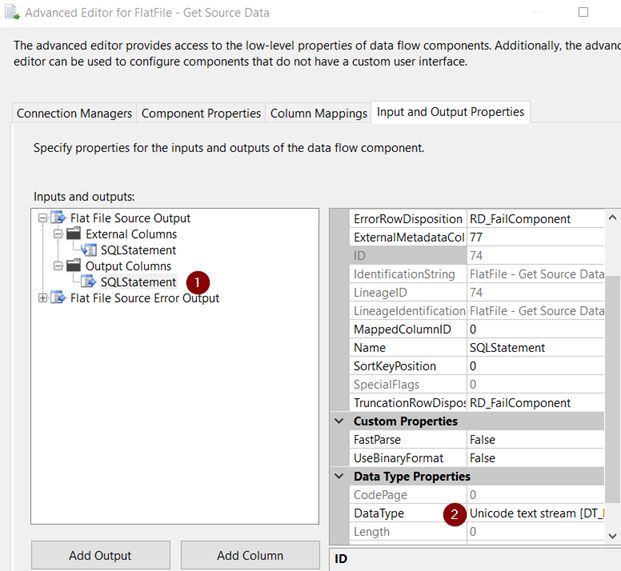
To import large text including special and foreign characters using Flat File follow this;
External Column = Text_Stream (DT_TEXT)
Output Column = Unicode Text Stream (DT_NTEXT)
This can handle up to 11000 characters. I think it’s more than sufficient. Make sure your SQL Database has NVARCHAR(MAX) column data type.
This will work if the column has 11000 characters or 1 character. It wouldn’t break the way Excel BLOB columns break. In Excel if the source column is configured as DT_NEXT and data is 1 character, the process blows up.