Edit /etc/apt/sources.list and paste following text.
deb http://deb.debian.org/debian/ stretch main contrib non-free
deb http://deb.debian.org/debian/ stretch-updates main contrib non-free
deb http://deb.debian.org/debian/ stretch-backports main
deb http://security.debian.org/ stretch/updates main contrib non-free
Remove all files from /etc/apt/sources.list.d
You might see this file after upgrade.
You will get the stretch based release candidate from ubiquiti.
Now were going to run through all the commands below. You will get some prompts about updating components, and restarting services, answer yes to these.
If you want to upgrade packages, go through these commands;
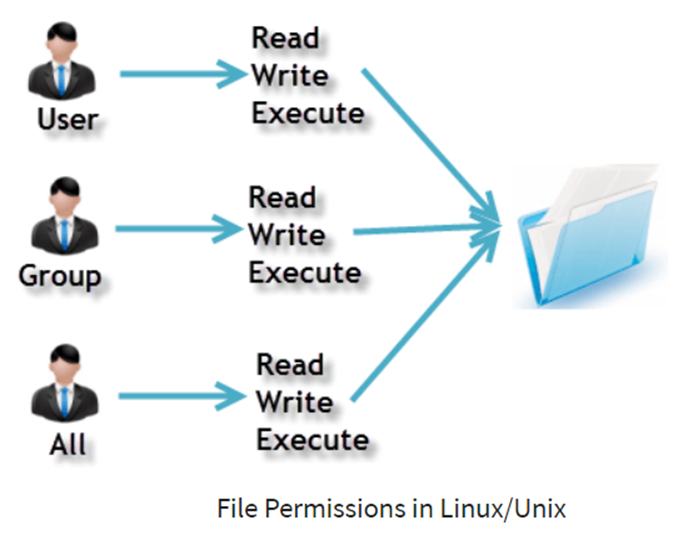
Linux is UNIX clone. For effective security, Linux divides authorization into 2 levels, Ownership and Permission.
Every file and directory is assigned 3 types of owner; User, Group and Other.
User is the owner of the file. By default, the person who creates a file becomes its owner. A logged-in user sometimes called an owner.
A user-group can contain multiple users. All users belonging to a group can have similar permissions. In this case the ownership belong to a group.
Other means setting permissions to the world. This person has neither create a file, nor belongs to a user group.
How Linux distinguish between these three users? This is where permissions comes in. Permission defines the user behavior.
Every file and directory has 3 permissions defined for 3 owners.
Read permission gives the authority to open and read a file. Read permission on directory gives the ability to lists its content.
Write permission gives the authority to modify the contents of a file. The write permission on a directory gives the authority to add, remove and rename files. Consider a scenario where you have to write permission on file but do not have write permission on the directory where the file is stored. You will be able to modify the file contents. But you will not be able to rename, move or remove the file from the directory.
Execute permission gives the authority to execute a program. In Windows, an executable program usually has an extension “.exe” and which you can easily run. In Unix/Linux, you cannot run a program unless the execute permission is set. If the execute permission is not set, you might still be able to see/modify the program code (provided read & write permissions are set), but not run it.
To summarize this, the Owner assigned permissions on every File and Directory.
Some Examples
ls -l
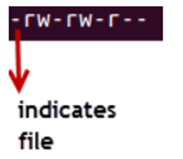
The highlighted “-rw-rw-r–“ code is the one that tells us the permission given to owner, group or the world.
The first ‘–‘ tells us that we have selected a file.
If this were a directory, d would be shown here;
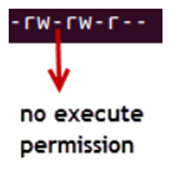
The characters are pretty easy to remember.
r = read permission w = write permission x = execute permission – = no permission
Let’s read and understand our sample file;
The first part of the code is ‘rw-‘. This is for the user. This tells us that the user can:
Read the file
Write or edit the file
He cannot execute the file since the execute bit is set to ‘-‘.
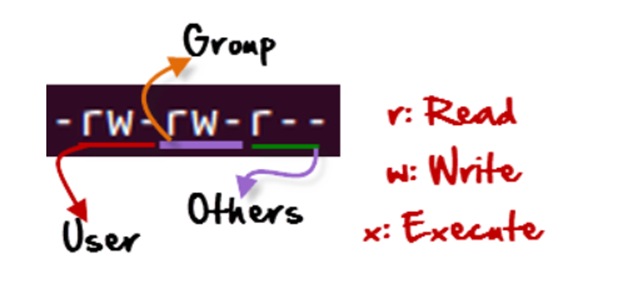
The second part is ‘rw-‘. This is for the user group for example ‘Home’. Group-members can:
Read the file
Write or edit the file
The third part is for the world which means any user. It says ‘r–‘. This means the user can only:
Read the file
Changing file/directory permission using ‘chmod’ command
To restrict user access (owner, group and the world) to files and folders we will use permissions (read, write, execute) using chmod (change mode) command.
chmod permissions filename
We can use Absolute (Numeric) mode or Symbolic mode to do this.
In Absolute mode, file permissions are not represented as characters but three-digit octal number. Here is a table that shows all possible permission types.
Number
Permission Type
Symbol
0
No Permission
—
1
Execute
–x
2
Write
-w-
3
Execute + Write
-wx
4
Read
r–
5
Read + Execute
r-x
6
Read +Write
rw-
7
Read + Write +Execute
rwx
Some Example
Checking current file permission;
chmod 764 and checking permission again;
chmod 764 MySmpleFile.txt
764 absolute code means;
Owner can read, write and execute (7). Usergroup can read and write (6). World can only read (4). This is shown as ‘-rwxrw-r–. In this mode we change permission for all 3 owners.
In Symbolic mode we change permissions of specific owner. It uses mathematical symbols.
Operator
Description
+
Adds permission to a file or directory
–
Removes the permission
=
Sets the permission and overrides earlier permissions set
The owners are represented as;
u
user/owner
g
group
o
other
a
all
Permission is set using characters like rwx. Here is an example;
Reset permission for this step;
chmod 664 MySmpleFile.txt
Current file permission
Setting permission to ‘other users’ AKA ‘world’ users
chmod o=rwx MySmpleFile.txt
Adding ‘Execute’ permission to usergroup.
chmod g+x MySmpleFile.txt
Removing ‘read’ permission for ‘user’
chmod u-r MySmpleFile.txt
For changing ownership and group of a file/directory, we use this command;
chown user filename
If we want to change the user and group for a file / directory, we use this command;
chown user:group filename
Here are examples;
Reset permission for this step;
chmod 664 MySmpleFile.txt
Check the current file ownership
Change file owner to pihole.
chown tanolis MySmpleFile.txt
Change file group to tanolis
In case, you don’t have the group, use this command to create one;
groupadd tanolis
change user and group back to root
In case we want to change group-owner only, we use this command;
chgrp group_name filename
‘chgrp’ stands for change roup.
Check current file group owner
Change the group owner to tanolis
Some key commands
The file /etc/group contains all the groups defined in the system
cat /etc/group
You can use the command “groups” to find all the groups user is member of.
You cannot have 2 groups owning the same file.
You do not have nested groups in Linux. One group cannot be sub-group of other
x- eXecuting a directory means Being allowed to “enter” a dir and gain possible access to sub-dirs.
SQL Server doesn’t support this and I don’t want to use OPENQUERY like this.
Select @@ServerName
EXEC sp_serveroption @@ServerName, 'DATA ACCESS', TRUE

SELECT  *
INTO    #tmpADD
FROM    OPENQUERY(YOURSERVERNAME, 'EXEC db.schema.mySPROC 1')
Using OPENROWSET will get the job done, but it will incur some additional overhead for opening up local connections and marshalling data. It also may not be an option in all cases since it requires an ad hoc query permission which poses a security risk and therefore may not be desired. Also, the OPENROWSET approach will preclude the use of stored procedures returning more than one result set. Wrapping multiple inline table-value user-defined functions in a single stored procedure can achieve this.
The first work around is to define structure of return values of stored procedure and create temp table.
CREATE TABLE #tmpADD
(
   COL1 INT,
   COL2 INT
)

INSERT INTO #tmpADD
Exec mySPROC 'Params'
This will work but if we ever add additional columns to the mySPROC stored procedure, this will blow up.
The second work around is to use an inline table-valued user-defined function. This is essentially a stored procedure (will take parameters) that returns a table as a result set; and therefore will place nicely with an INTO statement.
If we still have a driving need for a stored procedure, we can wrap the inline table-valued user-defined function with a stored procedure. The stored procedure just passes parameters when it calls select * from the inline table-valued user-defined function.
So for instance, Here is an inline table-valued user-defined function to get a list of customers for a particular region:
CREATE FUNCTION CustomersByRegion
(
    @RegionID int
)
RETURNS TABLE
AS
RETURN
  SELECT *
  FROM customers
  WHERE RegionID = @RegionID
GO
We can then call this function to get the results as such:
SELECT * FROM CustomersbyRegion(1)
Or to do a SELECT INTO:
SELECT * INTO CustList FROM CustomersbyRegion(1)
If we still need a stored procedure, then wrap the function as such:
CREATE PROCEDURE mySPROC
(
    @regionID int
)
AS
BEGIN
     SELECT * FROM CustomersbyRegion(@regionID);
END
GO
I think this is the most ‘hack-less’ method to obtain the desired results. It uses the existing features as they were intended to be used without additional complications. By nesting the inline table-valued user-defined function in the stored procedure, we have access to the functionality in two ways. Plus! We have only one point of maintenance for the actual SQL code.
If inline table value functions returns more than one schema then its is not possible to use IF statement in it. In this case we have to use table value function not inline table value function;
-- =============================================
-- Author:		Shahzad Khan
-- Create date: 2/1/2022
-- Description:	returns zoo data
-- SELECT * FROM  [dbo].[fn_getZooAnimal](2)
-- =============================================
CREATE FUNCTION fn_getZooAnimal
(
	-- Add the parameters for the function here
	@Id int
)
RETURNS
@Table_Var TABLE
(
	-- Add the column definitions for the TABLE variable here
	Id int,
	AnimalName NVARCHAR(50)
)
AS
BEGIN
	-- Fill the table variable with the rows for your result set
	IF (@Id = 1)
	BEGIN
		INSERT @Table_Var
		SELECT @Id, 'Monkey'
	END
	ELSE
	BEGIN
		INSERT @Table_Var
		SELECT @Id, 'Deer'
	END
	RETURN
END
GO
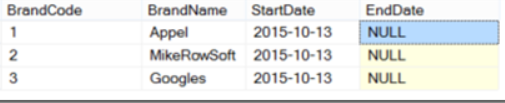
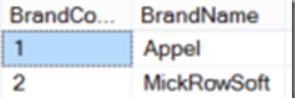
I have 2 tables one containing historical data using type 2 SCD (Slowly changing dimensions) called DimBrand and another containing just the latest dimension data called LatestDimBrand. Using the merge function I will insert new records from LatestDimBrand into DimBrand, I will archive (apply an end date) to any DimBrand records which do not appear in the latest data, and finally enter a new record and archive the old record for any Brands which may have changed.
DimBrand (the target of our Inserts, Updates, Deletes) and DimLatestBrand (the source for Inserts,Updates,Deletes):
DimBrand tableDimLatestBrand table
Here is complete merge statement;
INSERT #DimBrand    ([BrandCode],[BrandName],[StartDate])
SELECT                 [BrandCode],[BrandName],getdate()
FROM                (
                    MERGE #DimBrand AS Target
                    USING    (
                            SELECT    [BrandCode],[BrandName],[StartDate],[EndDate]
                            FROM    #LatestDimBrand
                            ) AS Source
                    ON     (Target.[BrandCode] = Source.[BrandCode])
                    -------------------------------
                    WHEN MATCHED AND Target.[BrandName] <> Source.[BrandName]
                        THEN
                        UPDATE SET Target.[EndDate] = getdate()
                    -------------------------------
                    WHEN NOT MATCHED BY TARGET
                        THEN
                        INSERT (
                                [BrandCode]
                                ,[BrandName]
                                ,[StartDate]
                                ,[EndDate]
                        )
                        VALUES (
                                Source.[BrandCode],
                                Source.[BrandName],
                                Source.[StartDate],
                                Source.[EndDate]
                        )
                    -------------------------------
                    WHEN NOT MATCHED BY SOURCE
                        THEN
                        UPDATE SET Target.[EndDate] = getdate()
                    -------------------------------
                    OUTPUT $Action, Source.*
                    ) As i([Action],[BrandCode],[BrandName],[StartDate],[EndDate])
                    -------------------------------
WHERE                [Action] = 'UPDATE'
AND                    BrandCode IS NOT NULL