Setting up Pi-hole as a recursive DNS server solution

Install this;

sudo apt install unbound

run this command;

nano /etc/unbound/unbound.conf.d/pi-hole.conf

copy and paste this from pi-hole site;

server:
    # If no logfile is specified, syslog is used
    # logfile: "/var/log/unbound/unbound.log"
    verbosity: 0

    interface: 127.0.0.1
    port: 5335
    do-ip4: yes
    do-udp: yes
    do-tcp: yes

    # May be set to yes if you have IPv6 connectivity
    do-ip6: no

    # You want to leave this to no unless you have *native* IPv6. With 6to4 and
    # Terredo tunnels your web browser should favor IPv4 for the same reasons
    prefer-ip6: no

    # Use this only when you downloaded the list of primary root servers!
    # If you use the default dns-root-data package, unbound will find it automatically
    #root-hints: "/var/lib/unbound/root.hints"

    # Trust glue only if it is within the server's authority
    harden-glue: yes

    # Require DNSSEC data for trust-anchored zones, if such data is absent, the zone becomes BOGUS
    harden-dnssec-stripped: yes

    # Don't use Capitalization randomization as it known to cause DNSSEC issues sometimes
    # see https://discourse.pi-hole.net/t/unbound-stubby-or-dnscrypt-proxy/9378 for further details
    use-caps-for-id: no

    # Reduce EDNS reassembly buffer size.
    # IP fragmentation is unreliable on the Internet today, and can cause
    # transmission failures when large DNS messages are sent via UDP. Even
    # when fragmentation does work, it may not be secure; it is theoretically
    # possible to spoof parts of a fragmented DNS message, without easy
    # detection at the receiving end. Recently, there was an excellent study
    # >>> Defragmenting DNS - Determining the optimal maximum UDP response size for DNS <<<
    # by Axel Koolhaas, and Tjeerd Slokker (https://indico.dns-oarc.net/event/36/contributions/776/)
    # in collaboration with NLnet Labs explored DNS using real world data from the
    # the RIPE Atlas probes and the researchers suggested different values for
    # IPv4 and IPv6 and in different scenarios. They advise that servers should
    # be configured to limit DNS messages sent over UDP to a size that will not
    # trigger fragmentation on typical network links. DNS servers can switch
    # from UDP to TCP when a DNS response is too big to fit in this limited
    # buffer size. This value has also been suggested in DNS Flag Day 2020.
    edns-buffer-size: 1232

    # Perform prefetching of close to expired message cache entries
    # This only applies to domains that have been frequently queried
    prefetch: yes

    # One thread should be sufficient, can be increased on beefy machines. In reality for most users running on small networks or on a single machine, it should be unnecessary to seek performance enhancement by increasing num-threads above 1.
    num-threads: 1

    # Ensure kernel buffer is large enough to not lose messages in traffic spikes
    so-rcvbuf: 1m

    # Ensure privacy of local IP ranges
    private-address: 192.168.0.0/16
    private-address: 169.254.0.0/16
    private-address: 172.16.0.0/12
    private-address: 10.0.0.0/8
    private-address: fd00::/8
    private-address: fe80::/10

save file CTRL+X.

Start local recursive server and test that it’s operational;

sudo service unbound restart
dig pi-hole.net @127.0.0.1 -p 5335

The first query may be quite slow, but subsequent queries, also to other domains under the same TLD, should be fairly quick.

You should also consider adding

edns-packet-max=1232

to a config file like /etc/dnsmasq.d/99-edns.conf to signal FTL to adhere to this limit.

Test Valiation

You can test DNSSEC validation using

dig sigfail.verteiltesysteme.net @127.0.0.1 -p 5335
dig sigok.verteiltesysteme.net @127.0.0.1 -p 5335

The first command should give a status report of SERVFAIL and no IP address. The second should give NOERROR plus an IP address.
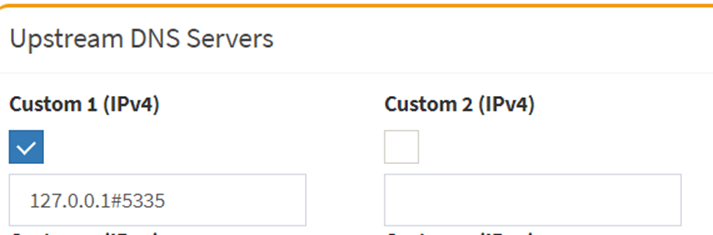
Configure Pi-hole

Finally, configure Pi-hole to use your recursive DNS server by specifying 127.0.0.1#5335 as the Custom DNS (IPv4):

Make sure this is the only record you have. For further info, refer to this;

https://docs.pi-hole.net/guides/dns/unbound/

Docker vs Podman

2022 might be the year of DevOps alternatives, including cloud providers, CI/CD tools and even containers. Speaking of containers, Podman looks like a promising alternative to Docker. Let’s see how they differ from each other.

Architecture

The Docker installation includes the Docker Daemon, the Docker API, and the Docker CLIDocker Daemon is a process which creates and manages the Docker images, containers, networks and volumes. It becomes a single point of failure since this process owns all of the child processses (docker containers).
If you decide to install the Docker Desktop version (Mac or Windows), you might also get an option to enable local Kubernetes cluster feature.

Basically, Docker uses a client-server model and operates as a all-in-one solution for container orchestration.

On the other side, Podman is a daemon-less tool for developing, managing and running OCI-compatible (Docker is OCI-compatible as well) containers.
Podman directly interacts with image registries, containers and volume storages, whereas Docker do this through the Daemon, hence Podman doesn’t need a daemon (uses Systemd instead to support running containers in the background).
The containers are run under the user starting the containers, which brings up to the second point, Security.

Security

By default Docker Daemon runs as a root user, which is so bad. It enables a privilege escalation. By any means, you could run Docker in a rootless mode and isolate containers with user namespaces, but it takes a while to configure it.

While Podman could be run as a root as well, running Podman as a nonprivileged user is a foundational feature, and it’s easier to setup.

Building images

Docker uses a native built-in command line tool to build images:

docker build  .

Podman relies on third-party tools, for instance Buildah is the most popular choice.

Pricing

Although Docker CE is free and open source, recently Docker comes up with a Subscription-based pricing plan, which mostly impacts medium and large enterprises.

Podman is free and open source.

Container Orchestration

Docker comes with a Docker Swarm container orchestrator.

Podman doesn’t support Docker Swarm. Added support for docker-compose though.

Documentation

Official Docker documentation.

Official Podman documentation.

Conclusion

Which one is the right one for you?! For beginners, Docker is a no-brainer, but once you start going down into the container rabbit hole, Podman would be the next wise choice.

Allow root SSH into Linux

This is not a good idea but sometime you need it for testing.

By default, the SSH server denies password-based login for root. In /etc/ssh/sshd_config, if the following line exists, possibly commented out (with a # in front):

PermitRootLogin without-password

Then change it to the following, uncommenting if needed (remove the # in front):

PermitRootLogin yes

And restart SSH:

sudo service ssh restart

Or, you can use SSH keys. If you don’t have one, create one using ssh-keygen (stick to the default for the key, and skip the password if you feel like it). Then do sudo -s (or whatever your preferred method of becoming root is), and add an SSH key to /root/.ssh/authorized_keys:

cat /home/user/.ssh/id_rsa.pub >> /root/.ssh/authorized_keys

Resources

https://askubuntu.com/questions/497895/permission-denied-for-rootlocalhost-for-ssh-connection

Cloud key gen2 plus stretch apt sources

Follow the steps outlined in this article up to PI-Hole installation.

Re-purpose cloud key gen2 plus

Now Follow this;

Check the version;

lsb_release -a

Create a backup of these files by copying to different location.

sudo cp -v /etc/apt/sources.list /root/
sudo cp -rv /etc/apt/sources.list.d/ /root/

Edit /etc/apt/sources.list and paste following text.


deb http://deb.debian.org/debian/ stretch main contrib non-free
deb http://deb.debian.org/debian/ stretch-updates main contrib non-free
deb http://deb.debian.org/debian/ stretch-backports main
deb http://security.debian.org/ stretch/updates main contrib non-free

Remove all files from /etc/apt/sources.list.d

You might see this file after upgrade.

You will get the stretch based release candidate from ubiquiti.

Now were going to run through all the commands below. You will get some prompts about updating components, and restarting services, answer yes to these.

If you want to upgrade packages, go through these commands;

sudo apt-get update
sudo apt-get upgrade
sudo apt-get full-upgrade
sudo apt-get –purge autoremove
reboot

Resources

Turn Unifi cloud key gen2 plus into headless Linux server