I am looking for a simple audio / video recording solution that can help me to record computer screens with audio.
I am planning to use OBD software. It’s free and open source. Here is a good tutorial on this tool.
download from here; It’s free.
Set base resolution = 30fps, video will be crisp. I am leaving it to default.
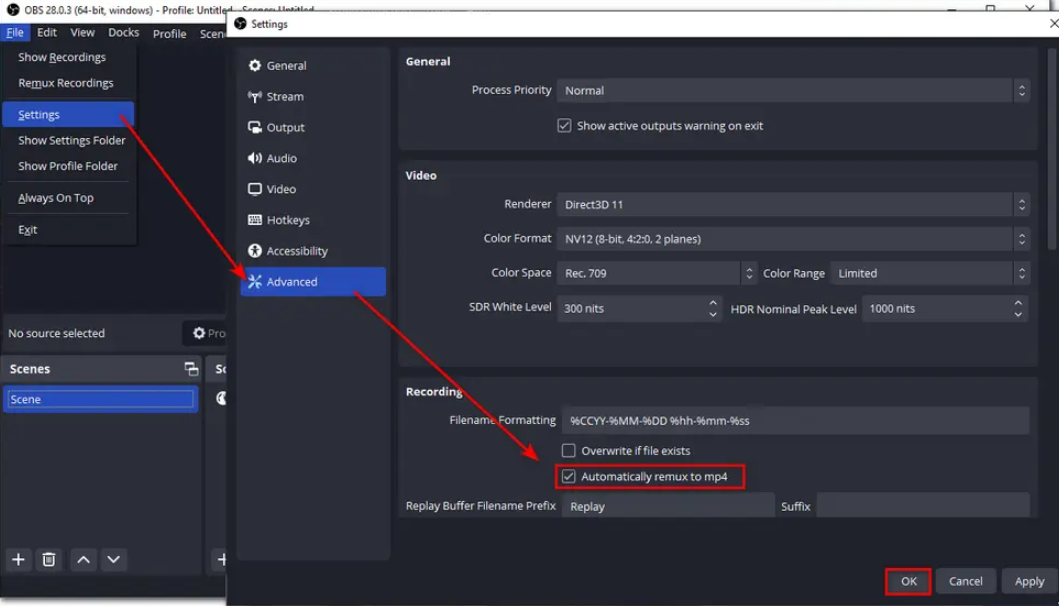
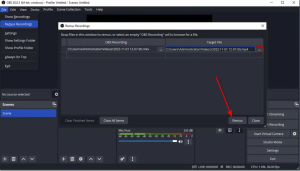
OBS file extension is mkv. We need to remux to get MP4. The reason mkv is default, a lecture of 2 hours terminates after 1 hour then we would have the video up-to the point of failure. If we set default to MP4 then risk of loosing 2 hour lecture is very high. Leaving it to default. You will be Happy doing remux as a second step.
OBS start and stop buttons are visible. We can edit it in editing software or we can use shortcuts to start and stop the video. We can add Hot keys if we want. The path is Settings -> Hot Keys. Add your favorite keys here; Press
ALT + F2 = Start/Stop
ALT + F3 = Pause/Resume
#-1. To resize video of me, click on Video Capture device, press ALT key and resize. This will crop the image.
#-2. To record a specific area of screen, Click on Display Capture, Press ALT and zoom in to screen area. This will record that screen area.
#-3. I can add a logo by dragging and dropping inside recording screen. I can make it smaller or larger.
#-4. To add a border around my face, add color source that match up with my logo. Add a color source.
#-5. To hide source from video, simply click (toggle) on the eye and my video or color source will go away.
#-6. To lock items, simply click on lock and now all of my sources are locked.
#-7. To have a cleaner interface, click on video, logo and color and make a group. Press shift, select sources and select “Group selected items”. Name them “Logo and Video”. This helps organizing my resources a little bit better.
#-8. This is trick. I am explaining and doesn’t want my face to show up. Click on Scene on the top. This will just show the desktop. When I am done with full desktop and wanted to bring back my face on the desktop, I can click on my focused scene “Proxmox performance – IPERF3”.
#-9. When I switch screen from scene to scene, it makes a hard cut. What if I want to add a transition? Click on Scene transitions and pick “Swipe”.
#-10. I don’t want OBS to shift my scene. Create following hot keys. Alt + F5.
#-11. I can add audio filters for example “Noise suppression”. This can help to suppress the noise of dog or lawn mower outside.
#-12. I can transform my resource. Click on the group and you can see transformation there.
#-13. We can re-arrange UI. To reset UI, click on View and Reset UI.
#-14. We can create profiles. Profile will store video specific scenes, for example “YouTube profile” etc.
#-15. Studio mode help us to preview without recording. The left side is live recording and right side is preview. We can make changes to the right side and when done click to swipe it to live view.
Now comes Video editing part;
There is another open source audio / video editing software, DaVinci Resolve. Here is the URL
https://www.blackmagicdesign.com/products/davinciresolve
This can be installed using admin account but wouldn’t be visible to user’s other than Admin. To make it visible to say Shahzad user account, copy admin profile to a user-defined folder e.g c:\video\blackmagic folder. Open folder and run it from there. took me some time to figure out this work around.
This one talks about cut page
pexals.com has free videos and audios that I can use in my videos.
Dafonts.com can be used to download fonts.
Here is a 2 start. This one talks about adding text.
This one has more views;
Here is how to add audio on existing recording
https://www.makeuseof.com/davinci-resolve-how-to-record-voiceover-audio
The best thing is to use your iPhone for voice recording. Laptop voice sucks. In my simple case, I don’t need to buy any voice recorder.